If you’re searching for how to self host n8n with Docker and PostgreSQL, chances are you’ve already realized two things: n8n is incredibly powerful, and running it the wrong way can quickly turn into a mess.
Many online guides show how to get n8n running in just a few minutes. However, very few explain how to host it properly for production environments, where workflows must remain reliable, secure, and recoverable when something goes wrong.
In this guide, we’ll go beyond basic installation and explore real-world approaches to self-hosting n8n. You’ll learn the different deployment methods, understand when each method makes sense, and see how they compare in terms of stability and scalability.
Finally, we’ll walk through a production-ready architecture using Docker and PostgreSQL — the setup commonly used by businesses, automation agencies, and serious builders who rely on n8n for critical workflows.
What Is n8n and Why Should You Self-Host It?
Before jumping into installation methods, it’s important to understand what n8n actually does and why self-hosting it makes sense for many businesses and automation-focused teams.
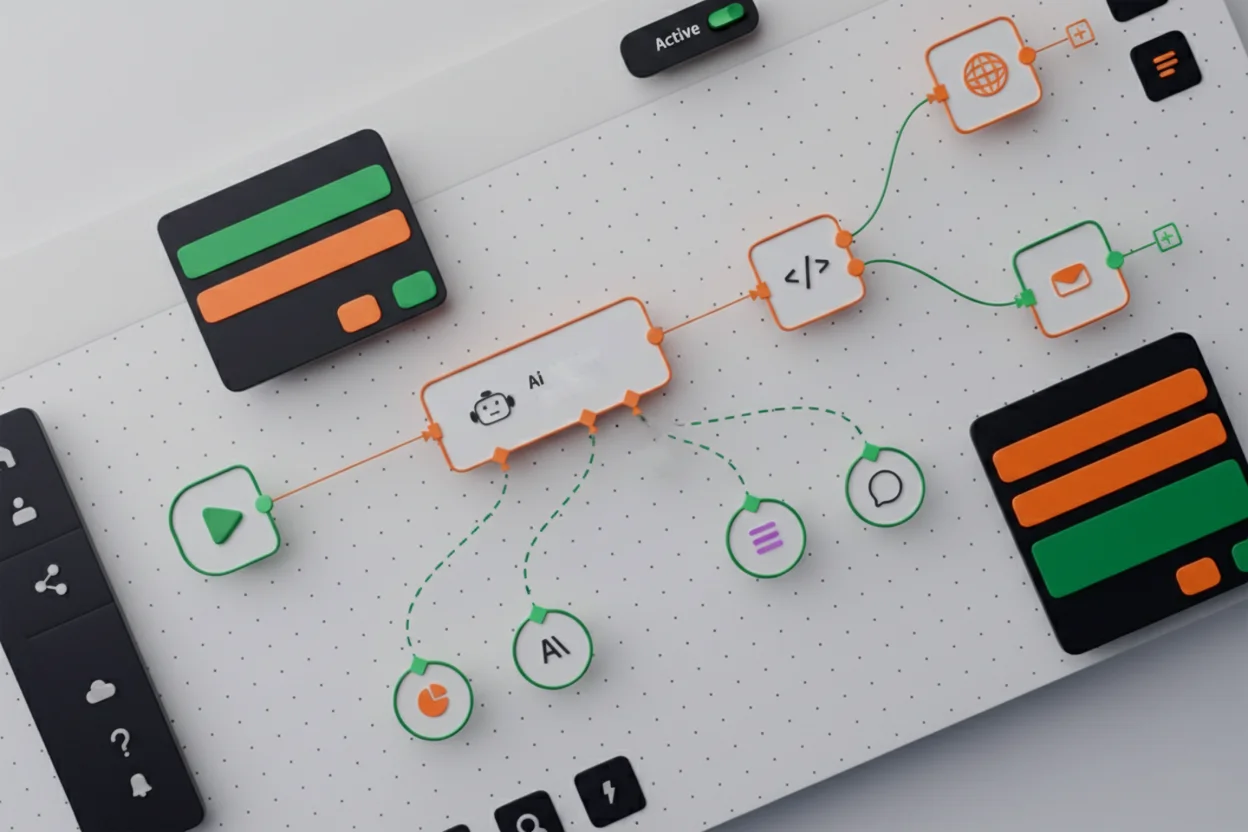
n8n is not just another automation tool—it’s a workflow automation engine that gives you deep control over how data moves between applications, APIs, and internal systems.
What n8n Does – Workflow Automation Explained for Businesses
n8n is an open-source workflow automation platform that allows you to connect different apps, services, and systems without writing full-scale applications.
In simple terms, n8n helps you:
- Automate repetitive business processes
- Connect tools that don’t natively talk to each other
- Build logic-based workflows using triggers, conditions, and actions
Unlike basic automation tools, n8n allows you to:
- Work with APIs directly
- Add custom logic and conditions
- Handle complex workflows with multiple branches
- Process data at scale
This makes n8n especially useful for:
- Automation agencies
- SaaS and product teams
- Businesses running internal operations
- Developers building custom integrations
Because n8n is open-source, you are not locked into a rigid platform. You can host it yourself, customize it, and scale it based on your needs.
Self-Hosted n8n vs n8n Cloud – Which One Should You Choose?
n8n offers both a cloud-hosted version and a self-hosted version, and the right choice depends on how you plan to use it.
n8n Cloud (Hosted by n8n)
- Quick to start
- Fully managed by the n8n team
- No server or infrastructure management required
- Ideal for teams that want to focus on building workflows rather than maintaining servers
However, the cloud version comes with:
- Execution limits
- Pricing that increases as usage grows
- Less control over infrastructure and data
Self-Hosted n8n
When you self-host n8n on your own server:
- You control your data
- You are not limited by executions
- You can integrate deeply with internal systems
- You can optimize performance based on workload
Self-hosting is especially valuable when:
- Automation is business-critical
- You are handling sensitive or client data
- You want predictable infrastructure costs
- You need full control over scaling and backups
For serious use cases, self-hosted n8n provides flexibility and long-term cost efficiency that cloud tools struggle to match.
Who Should Self-Host n8n (And Who Should Not)
Self-hosting n8n is powerful—but it’s not for everyone.
Self-Hosting n8n Is a Good Choice If:
- Automation plays a direct role in your operations, sales, or customer workflows
- You manage automations for clients or internal teams
- You need full control over data, credentials, and execution history
- You want to avoid usage-based pricing as workflows scale
You Should Avoid Self-Hosting n8n If:
- You only need simple, occasional automations
- You are not comfortable managing a server or VPS
- You don’t want to handle backups, security, or maintenance
- Automation is not critical to your business operations
In short, self-hosting n8n makes sense when automation is a core part of your business, not just a convenience feature.
Now that you understand what n8n is and when self-hosting makes sense, let’s look at the different ways you can self-host n8n, and which methods are suitable for production use.
Different Ways to Self-Host n8n on a VPS
There are multiple ways to self-host n8n on a VPS, and each approach serves a different purpose. Some methods are designed to get n8n running quickly with minimal setup, while others focus on stability, scalability, and long-term maintainability.
The right choice depends on how critical automation is to your business, how much control you need over the infrastructure, and whether the setup is meant for experimentation or production use.
In the following sections, we’ll break down the most common self-hosting approaches and explain when each method makes sense, along with their advantages and limitations.
Choose Your n8n Deployment Method
Select a method below to jump directly to the installation guide.
Method 1 – One-Click n8n Installation (Fastest Setup)
Method 1 – One-Click n8n Installation from Hosting Providers
One-click installers are offered by some hosting providers to help users deploy n8n with minimal technical effort.
How to Self-Host n8n Using Hostinger’s One-Click Installation
Below is the complete step-by-step process to deploy n8n using Hostinger’s one-click installation.
Step 1: Visit Hostinger’s Self-Hosted n8n Deployment Page click to go
Go to Hostinger’s official n8n deployment page and review the available plans.

Step 2: Choose a VPS Plan
Scroll down and select a VPS plan based on your requirements.
When choosing a plan, consider:
- Expected workflow executions
- RAM and CPU allocation
- Storage capacity
Note: Pricing and offers may vary depending on your location.

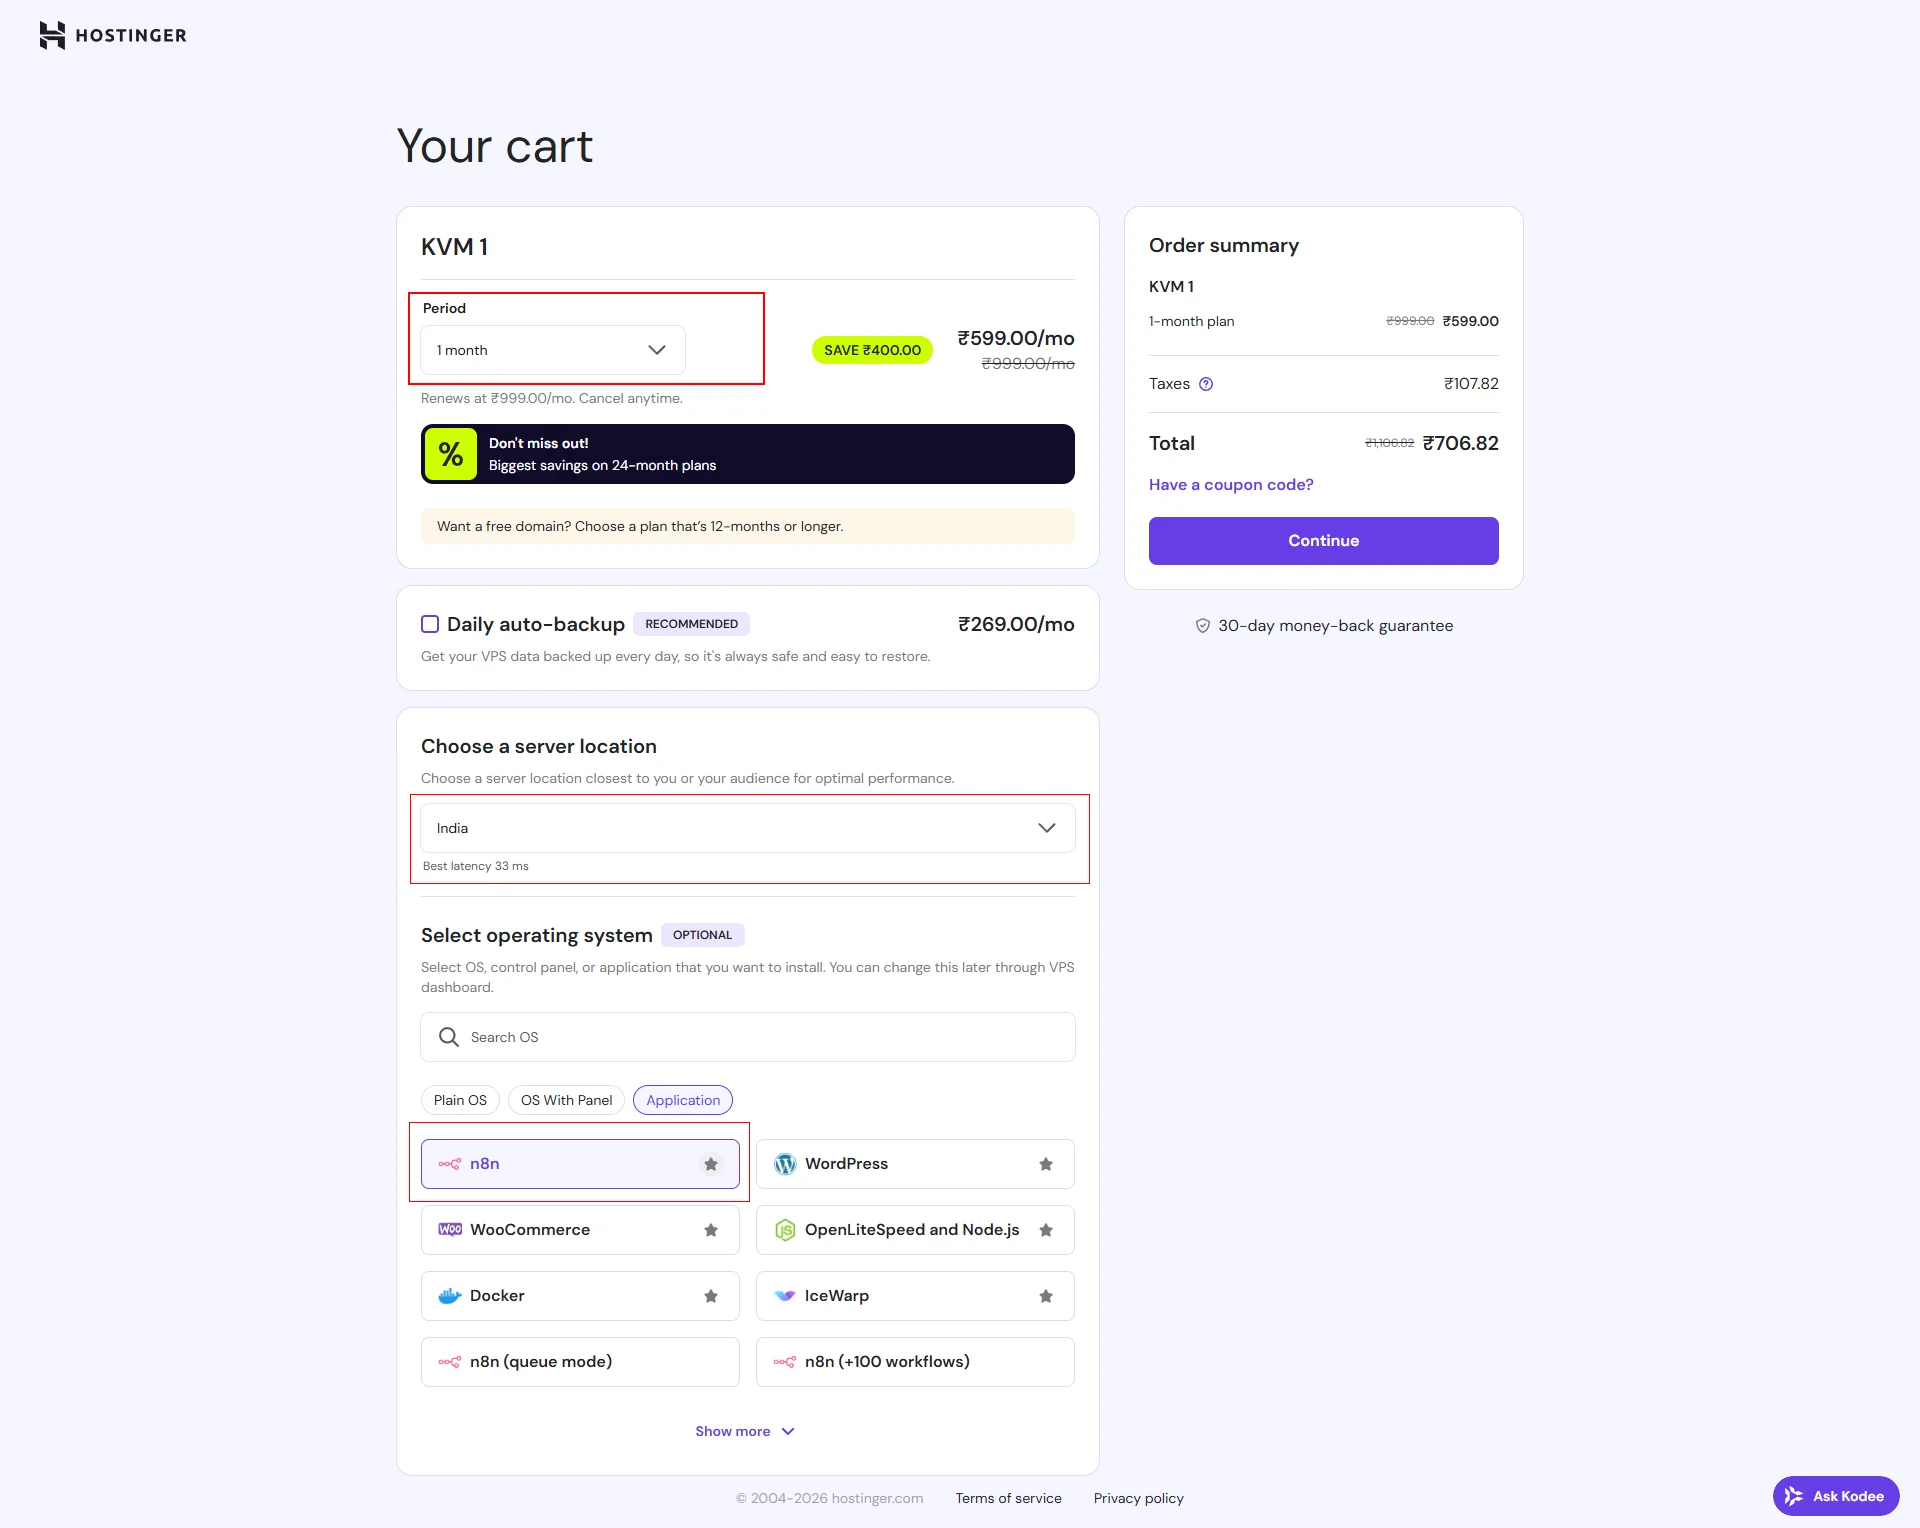
Step 3: Configure Your VPS (Period, Location & Application)
After selecting a plan, you will be redirected to the configuration page.
Here you need to:
- Select the billing period (monthly or yearly)
- Choose the server location (preferably closest to your target audience)
- Under Operating System, switch to the Application tab
- Select n8n from the available applications
This ensures your VPS is provisioned with n8n pre-installed.
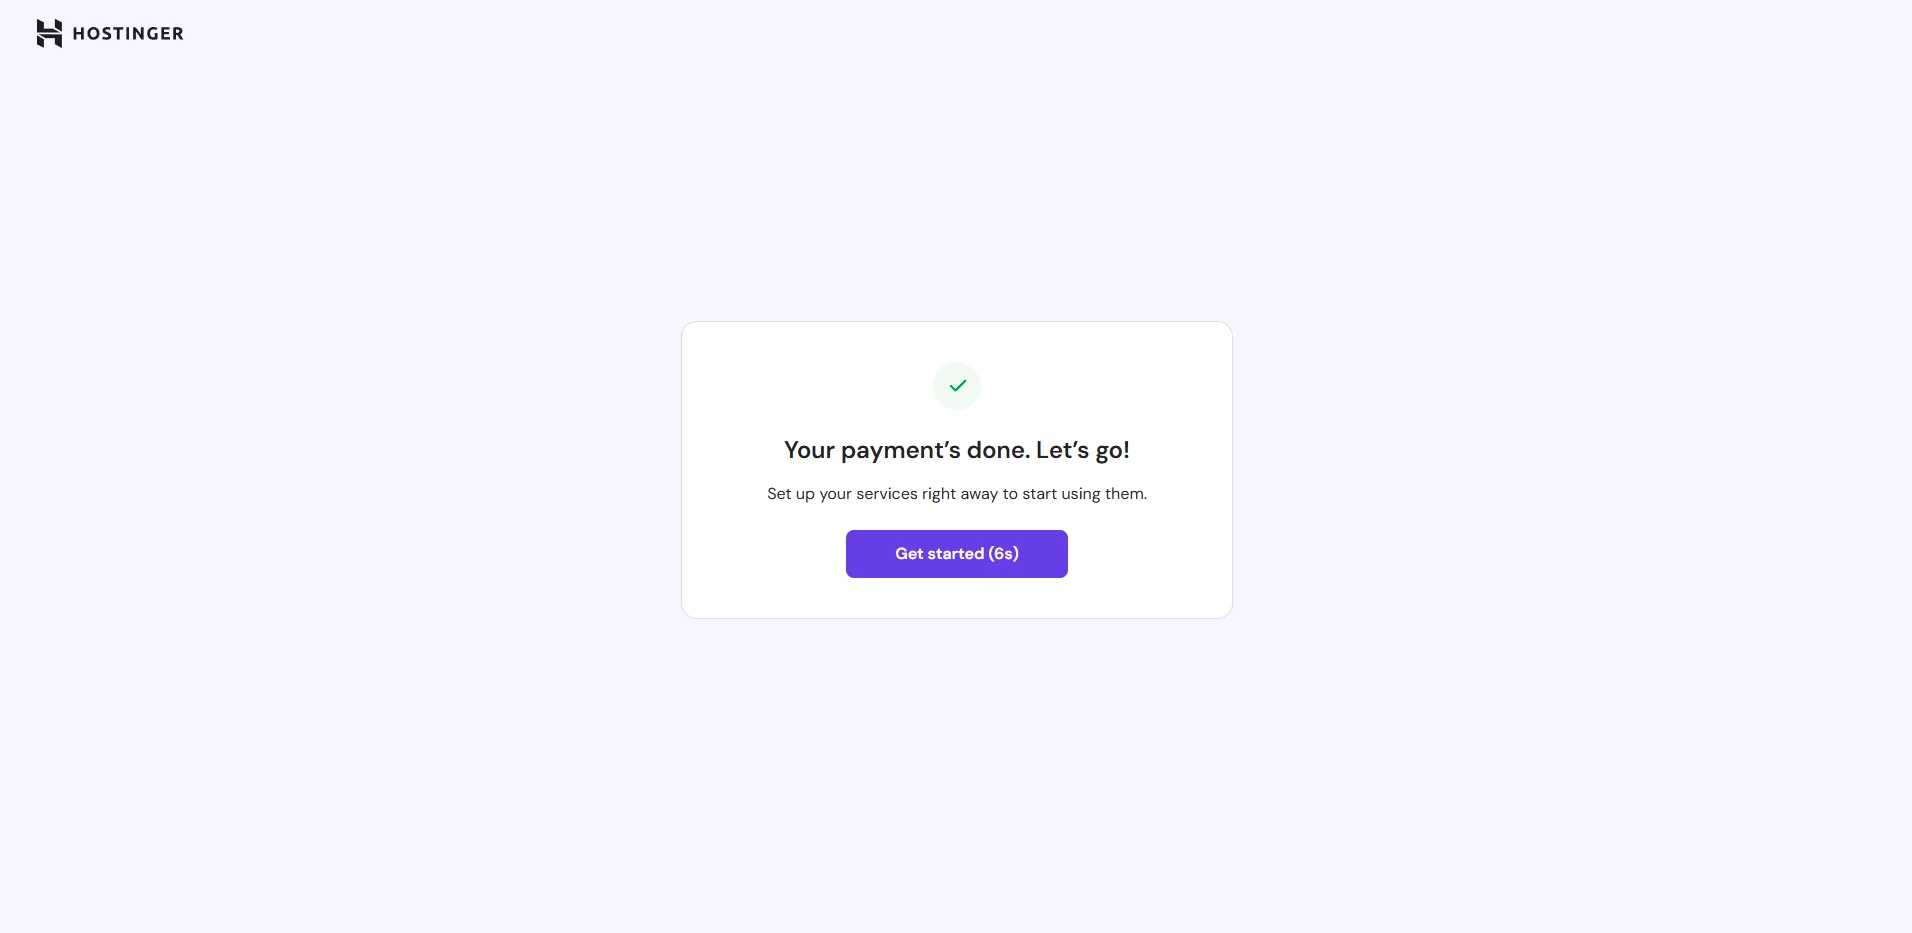
Step 4: Complete the Payment.
Fill in your billing details and complete the purchase.
Once payment is confirmed, Hostinger will automatically start provisioning your VPS.
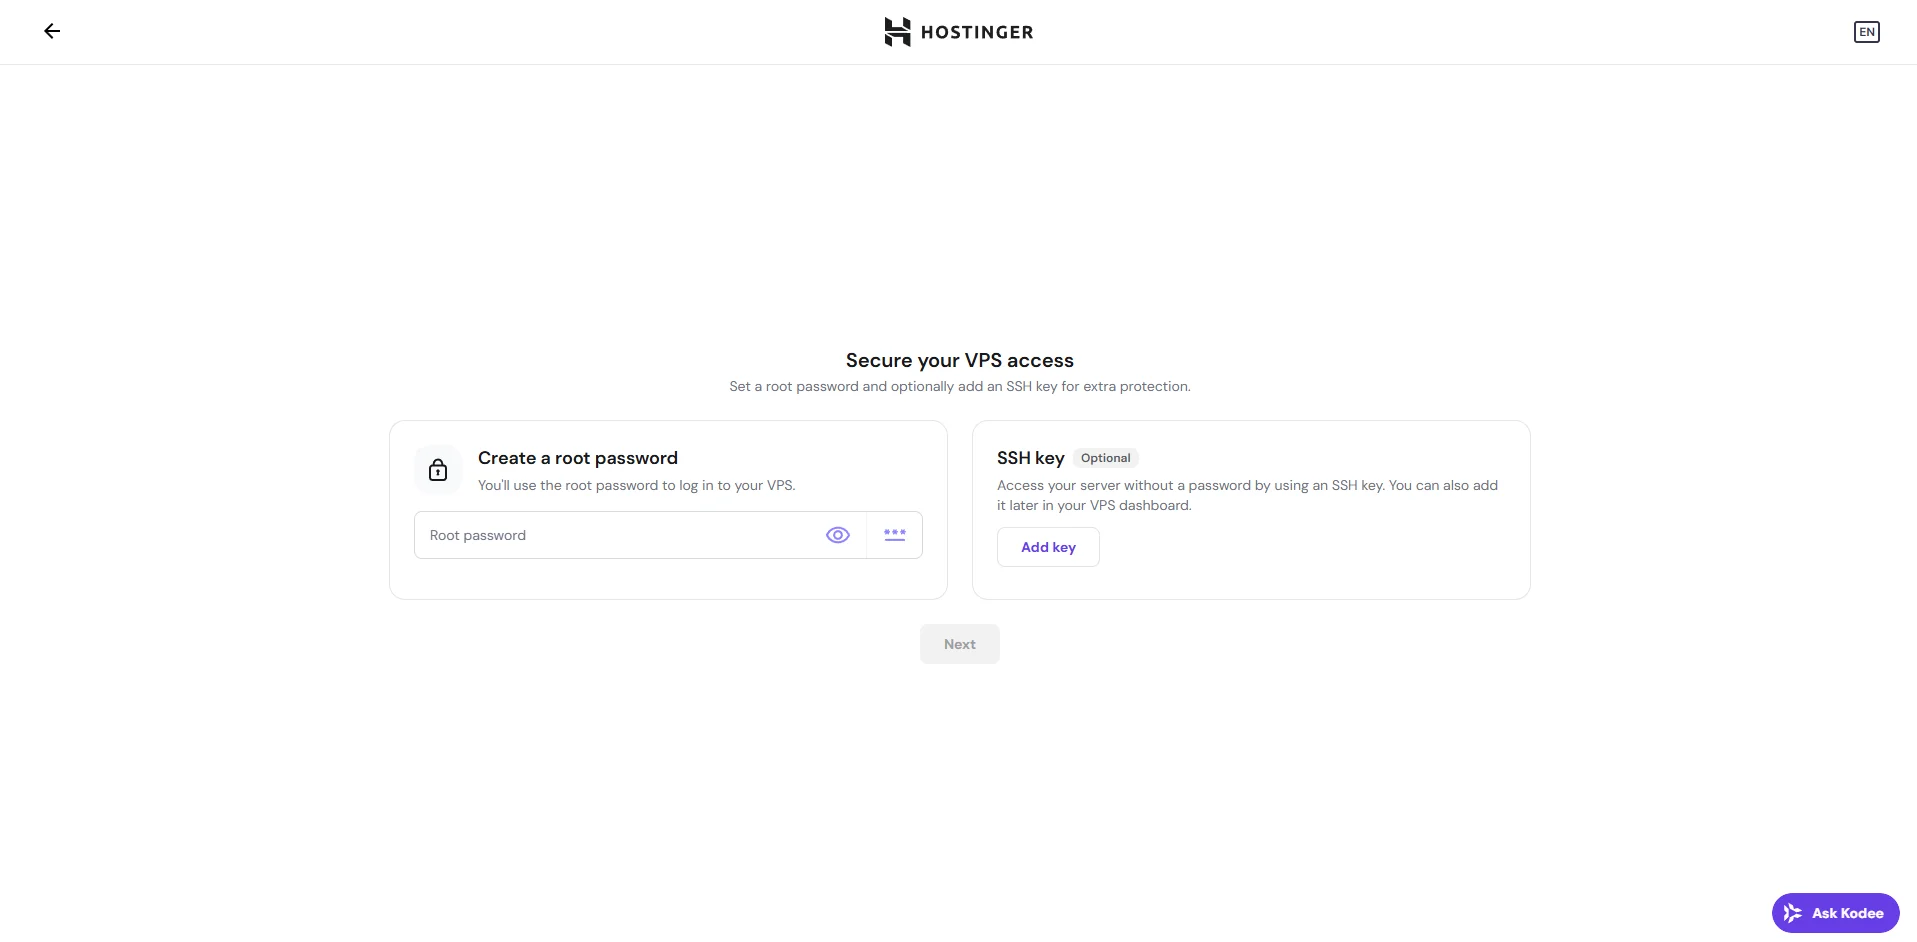
Step 5: Set Root Password and Optional SSH Key
After provisioning begins, you will be prompted to:
- Create a root password (required)
- Add an SSH key (optional but recommended for secure access)
This secures your VPS environment.
Step 6: Access Your VPS Dashboard
Once setup is complete, you will see the VPS management screen where you can:
- Access the VPS server
- Manage SSH access
- Open the n8n application

Step 7: Open and Configure n8n
Click Manage App to access your self-hosted n8n instance.
On first login, you will:
- Create your admin account
- Set login credentials
- Complete the initial n8n setup
After this, you will be redirected to the n8n dashboard and can begin building workflows

Your n8n instance is now successfully deployed and ready for workflow automation.
How to Self-Host n8n Using One-Click App Installer on Contabo
Below is the step-by-step process to deploy n8n using Contabo’s VPS with a pre-installed n8n image.
Step 1: Select an n8n VPS Plan on Contabo click here
Visit Contabo’s VPS page and choose a plan based on your performance requirements.
Consider:
- CPU cores
- RAM
- Storage type
- Monthly budget
Note: Pricing may vary depending on location and selected region.
Step 2: Configure Your VPS
Here you need to:
- Choose the VPS term (1 month, 6 months, 12 months, etc.)
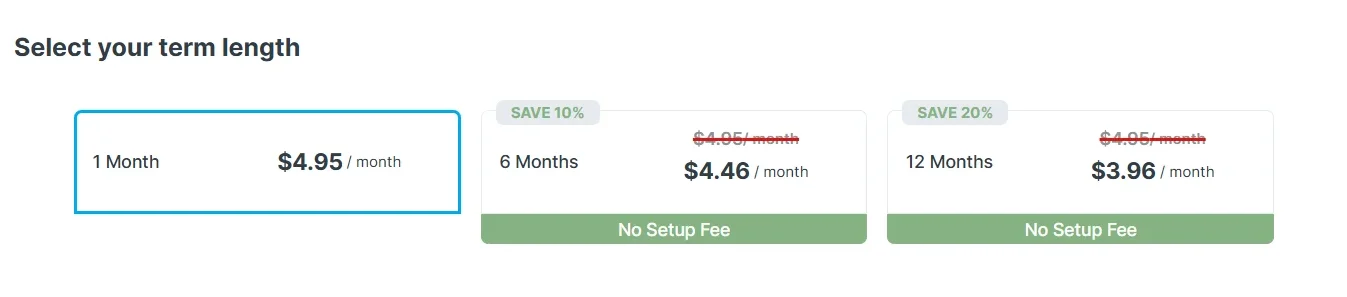
- Select your preferred server region
- Choose storage type (NVMe recommended for better performance)
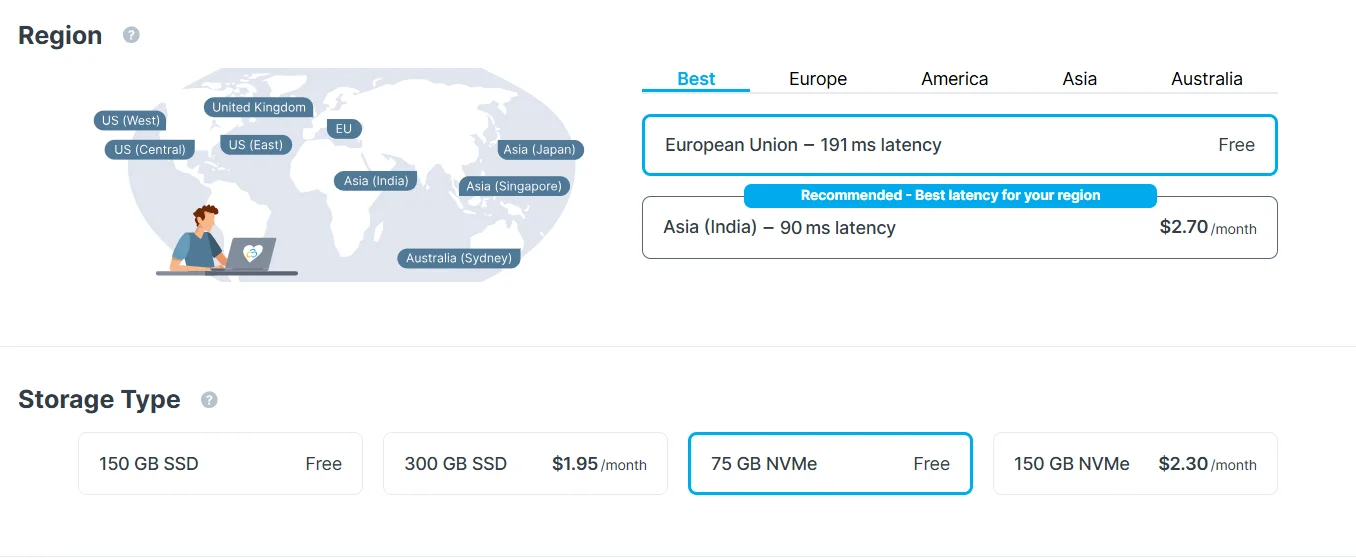
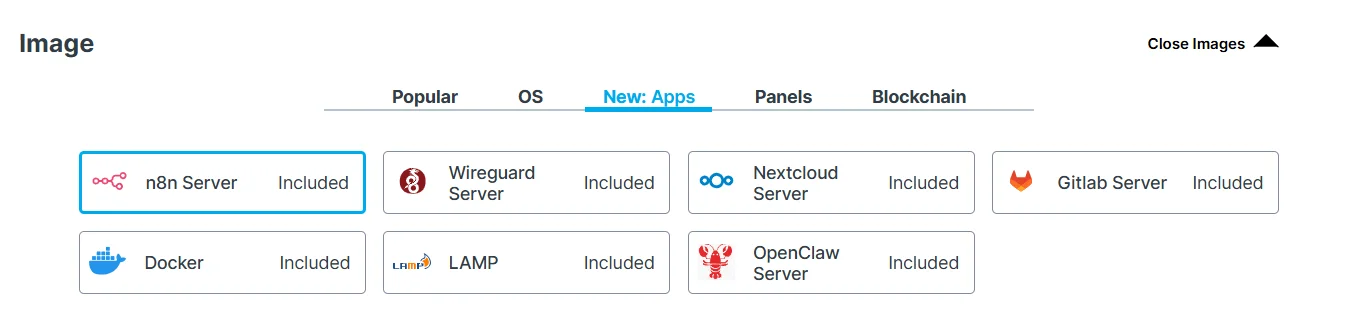
- Select n8n under the application or image section
Step 3: Set Root Login Credentials
In the configuration section, set:
- Root username
- Secure password
This will be used to access your VPS.

Step 4: Enter Personal and Billing Information
Fill in your personal details and proceed to payment.

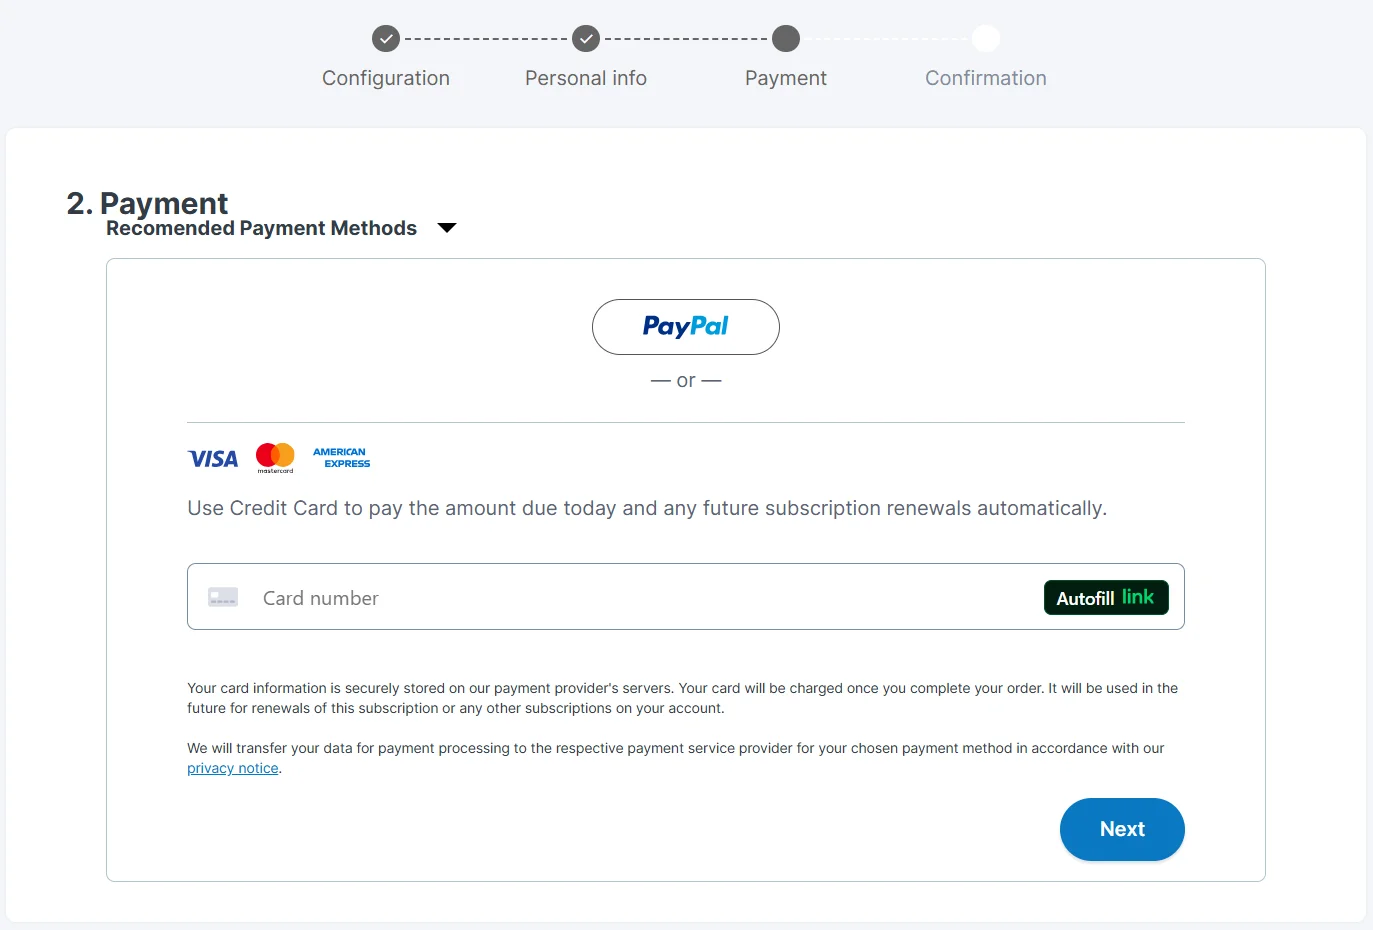
Step 5: Complete Payment and Confirm Order
Verify all configuration details and complete the payment process.

After successful payment, Contabo will begin provisioning your VPS.
Step 6: Access n8n via Login URL
After deployment, you will receive an email containing:
- VPS access credentials
- n8n login URL
- Default username and password
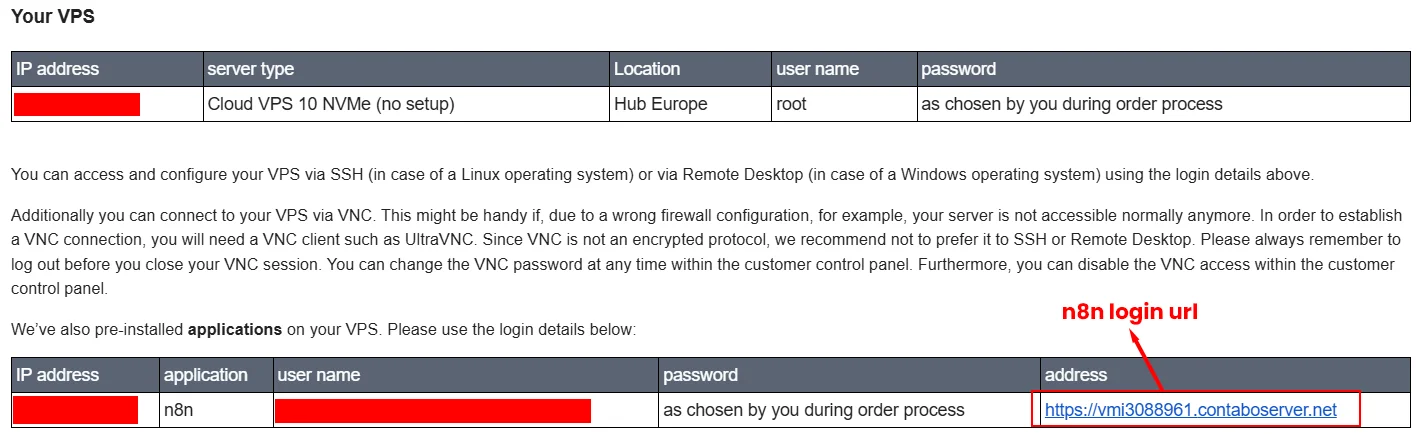
Click the login URL and access your n8n dashboard.

Your n8n instance is now deployed and accessible via the provided login URL.
Why One-Click n8n Installations Exist
- Designed for non-technical users
- Fast setup for testing and learning
- Minimal server configuration required
When This Method Makes Sense
- You want to explore n8n features quickly
- You are running personal or low-risk workflows
- Automation downtime is not business-critical
Pros of One-Click n8n Hosting
- Very fast setup
- No Docker or server knowledge required
Cons of One-Click n8n Hosting
- Limited environment configuration
- Usually uses SQLite instead of PostgreSQL
- Difficult to scale or optimize
- Vendor lock-in with the hosting provider
Method 2 – Self-Hosting n8n Using Docker Directly on a VPS
This method involves manually installing Docker and running n8n containers directly on a VPS without any server management panel.
Unlike one-click installations, this method gives you full control over the server environment. Instead of deploying a pre-configured n8n instance, you will manually install Docker and run n8n using containers. This approach is more flexible
Step-by-Step Guide to Self-Host n8n Using Docker on a VPS
In this section, we’ll walk through the complete process of deploying n8n on a VPS using Docker.
The steps below will guide you through preparing the VPS, installing Docker and Docker Compose, creating the n8n Docker configuration, and launching the containers. By the end of this setup, you will have a fully functional n8n instance running on your server that can later be secured with a domain and SSL.
Step 1: Choose a VPS Provider and Deploy a Server
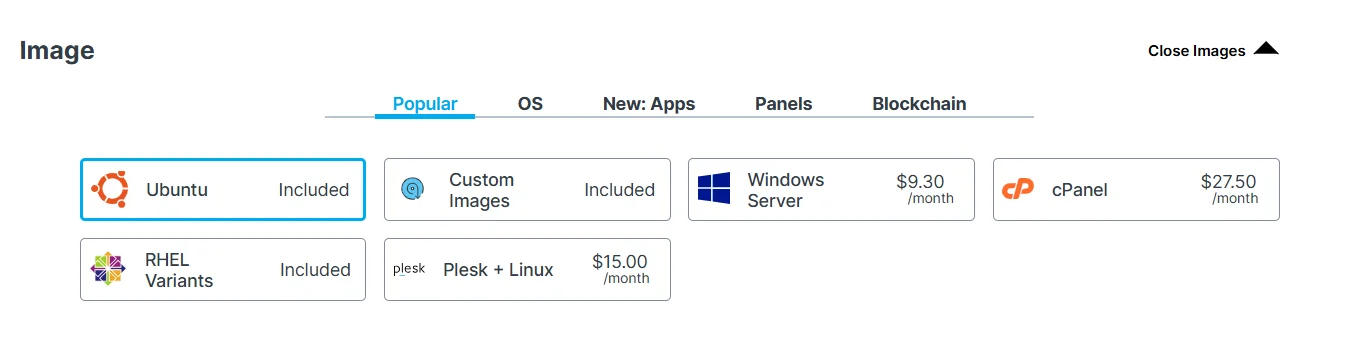
You can use the same VPS providers mentioned earlier (such as Contabo or Hostinger), but instead of selecting n8n as the application, choose:
- Operating System (OS): Ubuntu 24.04 LTS (recommended)
- No pre-installed applications
If you’ve already purchased a VPS in Method 1, you can create a new instance using Ubuntu instead of the n8n template.
Refer to the Getting VPS from Contabo Section

Step 2: Connect to Your VPS via SSH
Use terminal (Mac/Linux) or Git bash (Windows) (download git bash from here)
Command :
ssh root@your-server-ip (Server ip you can get from your hosting dashboard)
After adding this command hit enter you will be prompted with accept fingerprint. Type yes and hit enter
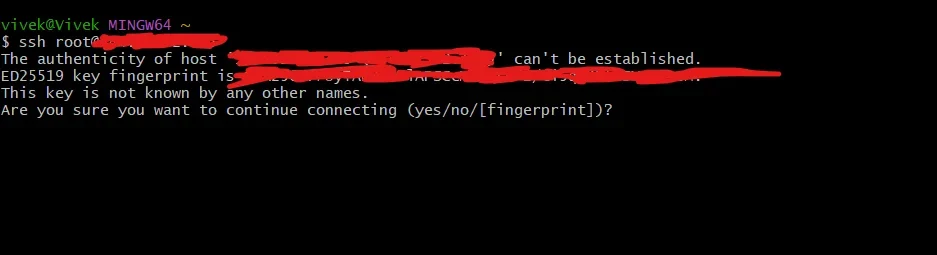
Now you will see the password prompt. Enter your vps root password and hit enter.

Once connected you will see this screen
Step 3: Update Server Packages
Before installing Docker or any additional software, it is important to update your server packages to ensure you are working with the latest security patches and system updates.
Run the following command:
apt update && apt upgrade -y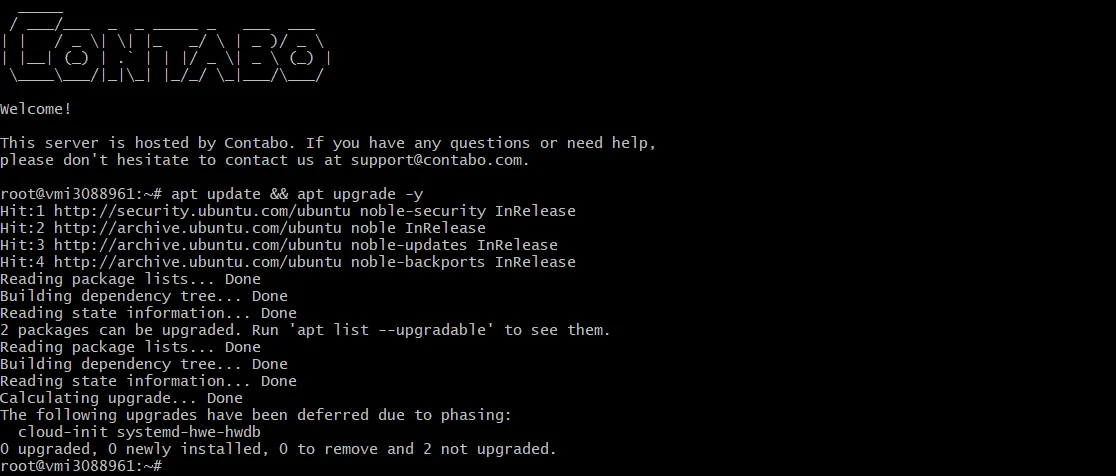
What this command does
- apt update refreshes the package index and fetches the latest available package information from Ubuntu repositories.
- apt upgrade -y installs the latest versions of all currently installed packages automatically.
Step 4: Install Docker
To run n8n using containers, we first need to install Docker on the server. Below is the official installation method for Ubuntu.
Step 4.1: Install Required Dependencies
Run the following command:
apt install apt-transport-https ca-certificates curl software-properties-common -y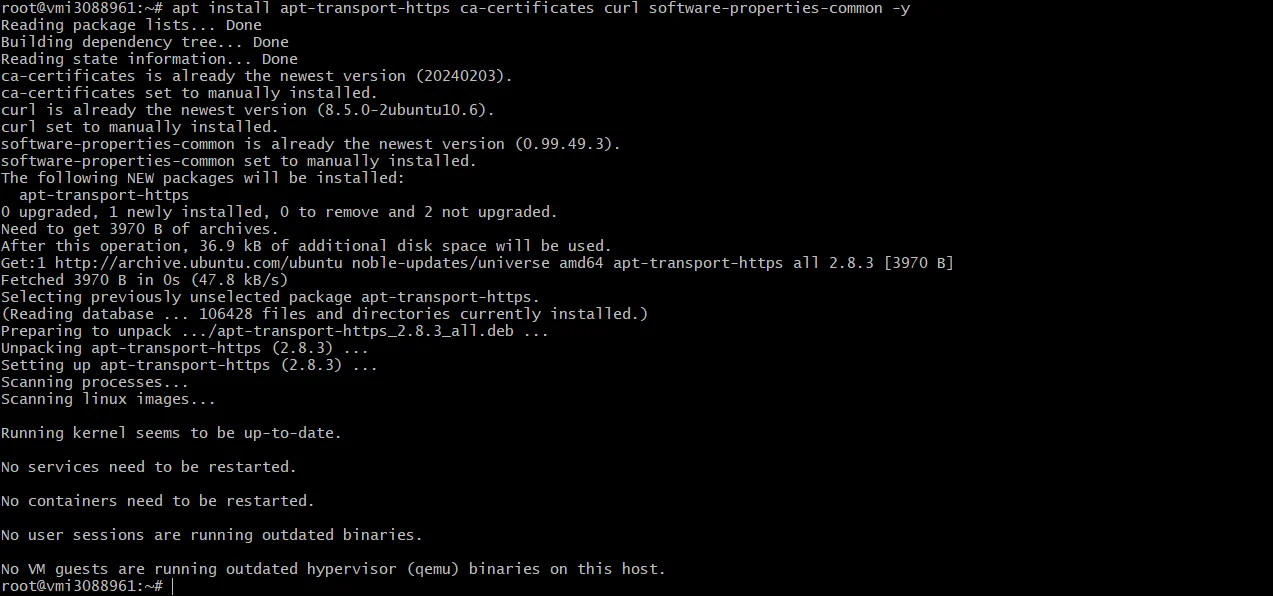
These packages allow Ubuntu to securely download and verify Docker packages.
Step 4.2: Add Docker’s Official GPG Key
Run this command:
curl -fsSL https://download.docker.com/linux/ubuntu/gpg | gpg --dearmor -o /usr/share/keyrings/docker-archive-keyring.gpgThis ensures that Docker packages are verified and trusted by your system.
Step 4.3: Add the Official Docker Repository
Run this command:
echo "deb [arch=$(dpkg --print-architecture) signed-by=/usr/share/keyrings/docker-archive-keyring.gpg] https://download.docker.com/linux/ubuntu $(lsb_release -cs) stable" | tee /etc/apt/sources.list.d/docker.list > /dev/nullThis tells Ubuntu where to download Docker from.
Step 4.4: Update Package Index Again
apt updateNow Ubuntu will recognize Docker packages from the newly added repository.
Step 4.5: Install Docker Engine
Run this command:
apt install docker-ce docker-ce-cli containerd.io -yThis installs:
- Docker Engine
- Docker CLI
- Container runtime
Step 4.6: Verify Docker Installation
Check if Docker is installed correctly with this command:
docker --versionYou should see output similar to:
Docker version 24.x.x, build xxxxx
Step 4.7: Enable Docker to Start on Boot
command:
systemctl enable docker
Start Docker service:
systemctl start dockerStep 4.8: Verify Docker Service Status
Command:
systemctl status docker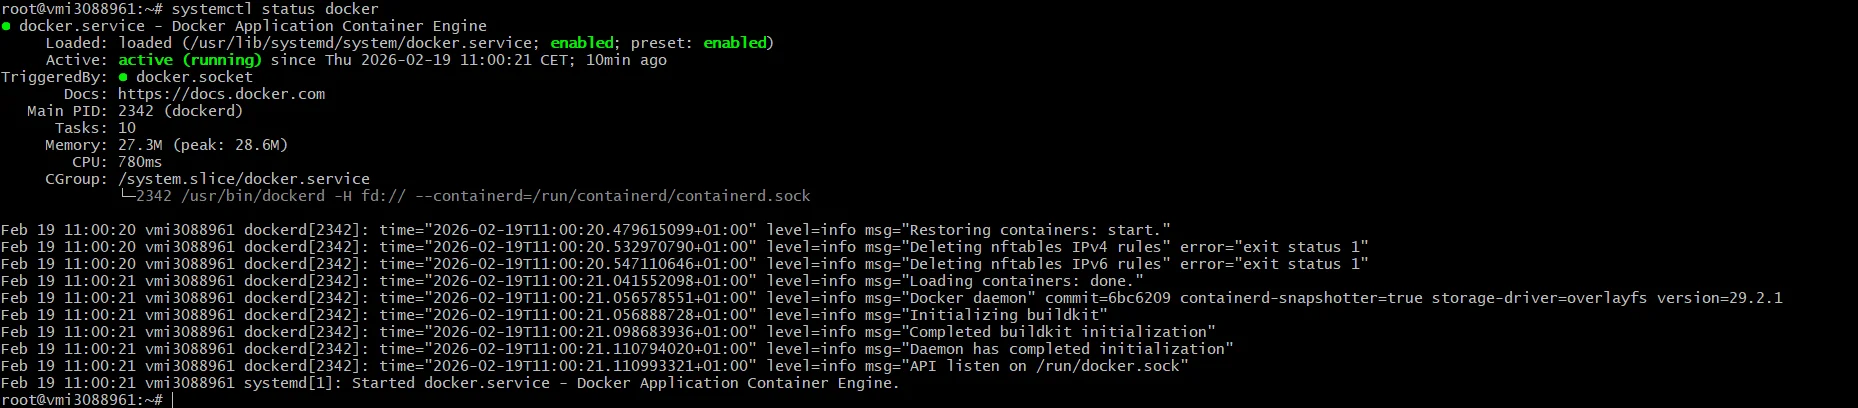
You should see active (running)
Step 5: Install Docker Compose (Plugin Method – Recommended)
Docker Compose is now distributed as a Docker plugin (not the old standalone binary). This is the recommended and modern approach.
Step 5.1: Install Docker Compose Plugin
Run
apt install docker-compose-plugin -y
Step 5.2: Verify Installation
Run Command:
docker compose versionYou should see output similar to:
Docker Compose version v2.x.x
Step 5.3: Test Docker Compose
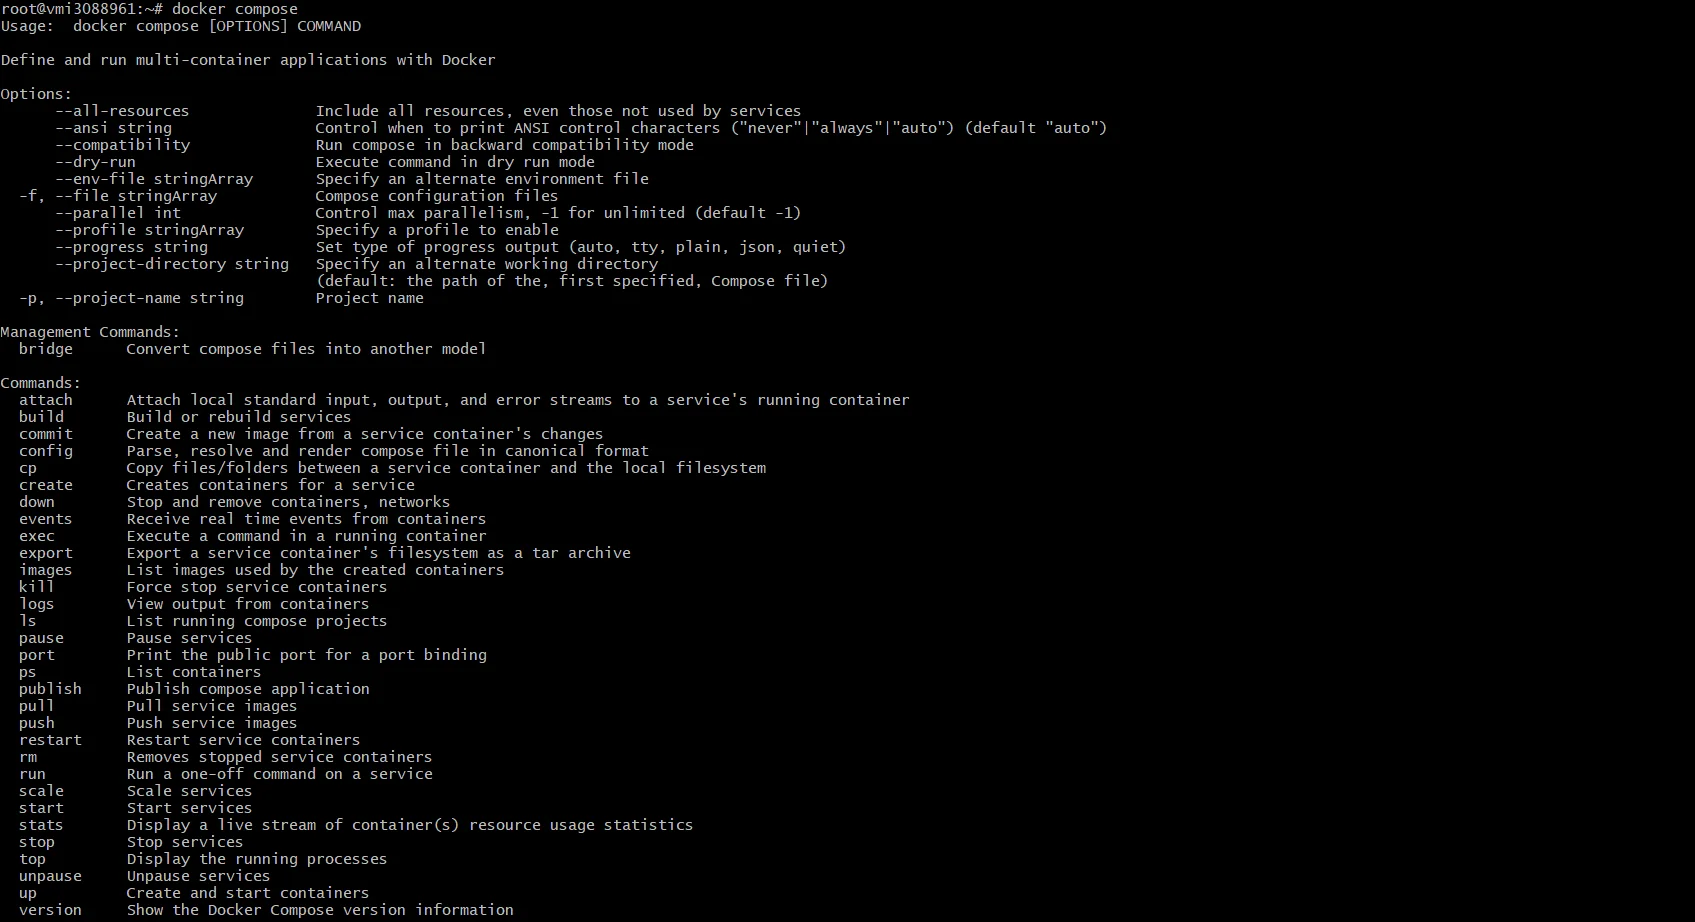
Run
docker composeIf it shows command help output, installation is successful.
Why we use docker compose
For n8n production setup we need:
- n8n container
- PostgreSQL container
- Environment variables
- Volumes
- Restart policies
Docker Compose allows us to manage everything inside a single docker-compose.yml file.
Step 6: Create a Project Directory for n8n
Step 6.1: First, create a dedicated directory for your n8n setup.
command:
mkdir -p /opt/n8n
cd /opt/n8n
You can confirm your location with:
pwdIt should show:
/opt/n8n
Step 6.2: Create the docker-compose.yml File
Run the command
nano docker-compose.ymlThis will open the Nano editor. Paste This Production-Ready Configuration
services:
  postgres:
    image: postgres:15
    container_name: n8n_postgres
    restart: always
    environment:
      POSTGRES_USER: n8n
      POSTGRES_PASSWORD: strongpassword
      POSTGRES_DB: n8n
    volumes:
      - n8n_postgres_data:/var/lib/postgresql/data

  n8n:
    image: n8nio/n8n:latest
    container_name: n8n_app
    restart: always
    ports:
      - "5678:5678"
    environment:
      - DB_TYPE=postgresdb
      - DB_POSTGRESDB_HOST=postgres
      - DB_POSTGRESDB_PORT=5432
      - DB_POSTGRESDB_DATABASE=n8n
      - DB_POSTGRESDB_USER=n8n
      - DB_POSTGRESDB_PASSWORD=strongpassword
      - N8N_SECURE_COOKIE=false
      - N8N_ENCRYPTION_KEY=secure_encryption_key
    depends_on:
      - postgres
    volumes:
      - n8n_data:/home/node/.n8n

volumes:
  n8n_postgres_data:
  n8n_data:
Important:
Edit These Before Saving
strongpassword
secure_encryption_key (Generate from here)
Since right now we are installing the n8n directly on docker without any ssl so we have added this environment
– N8N_SECURE_COOKIE=false
In the steps we will remove this and serve the n8n with a domain with SSl on it.
Save and Exit Nano
- Press: CTRL + X
- Then press: Y
- Then hit: Enter
Step 6.3: Start n8n and PostgreSQL Containers
Run:
docker compose up -dThis will:
- Pull PostgreSQL image
- Pull n8n image
- Create volumes
- Start containers in detached mode

Verify Containers Are Running
Run Command:
docker psYou should see:
- n8n_postgres
- n8n_app
Both with status: Up
Step 6.4: Access n8n in Your Browser
Open: http://your-server-ip:5678

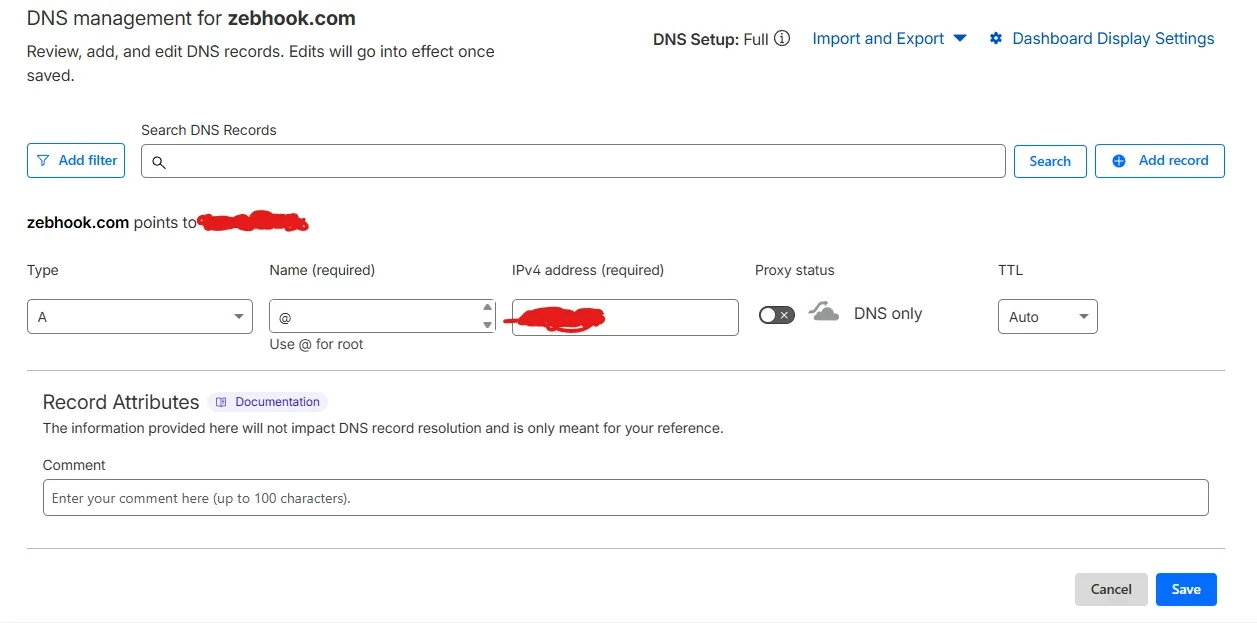
Step 7: Point Your Domain to Your VPS
Before touching the server, configure DNS.
Go to your domain provider and in dns records:
Add an A Record
| Type | Host | Value | TTL |
| A | @ | Your VPS Public IP | Default |
If you want subdomain like: n8n.yourdomain.com
Then:
| Type | Host | Value | TTL |
| A | n8n | Your VPS Public IP | Default |

Wait 5–10 minutes for DNS propagation.
Now go to https://dnschecker.org/
Add your domain name and in the dropdown select type A and hit search. You should see your VPS ip in front of country Flags/Names.

Now your domain is pointing to the server.
Step 8: Install Nginx
On your VPS, run:
apt install nginx -y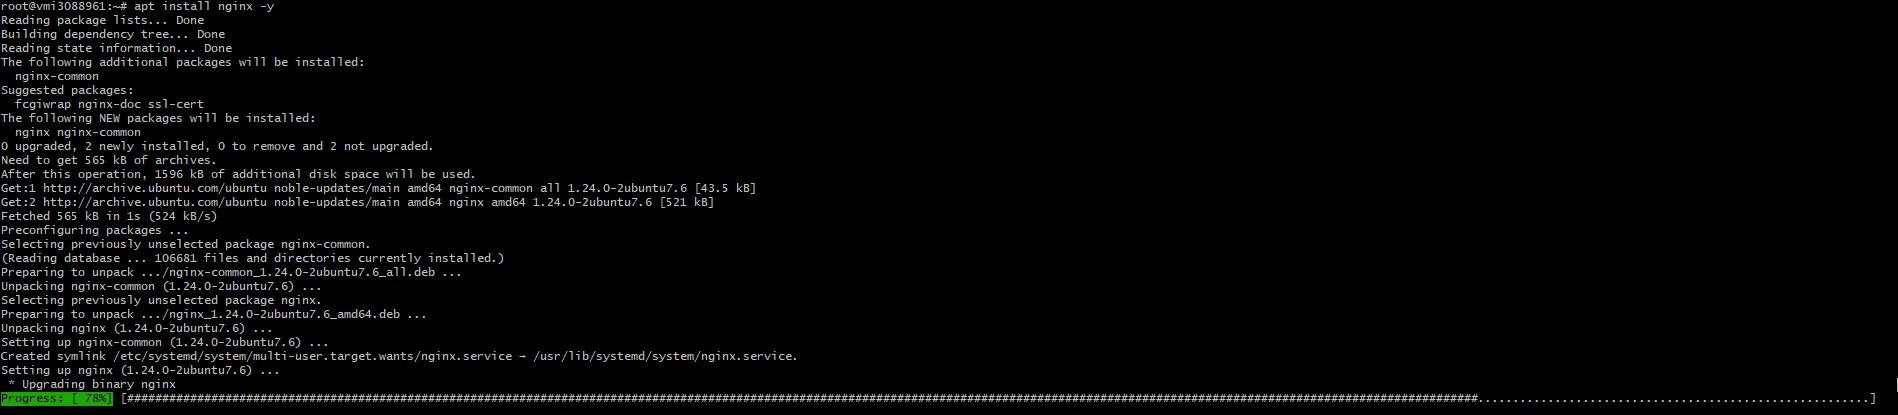
Start and enable it:
systemctl enable nginx
systemctl start nginx
Check status:
systemctl status nginxIt should show: active (running)

Step 9: Create Nginx Reverse Proxy Configuration
Create new config file:
Run:
nano /etc/nginx/sites-available/n8nPaste this:
server {
    listen 80;
    server_name yourdomain.com;

    location / {
        proxy_pass http://localhost:5678;
        proxy_http_version 1.1;
        proxy_set_header Upgrade $http_upgrade;
        proxy_set_header Connection 'upgrade';
        proxy_set_header Host $host;
        proxy_cache_bypass $http_upgrade;
    }
}
Replace yourdomain.com with your domain
Save and exit.
Enable This Configuration
ln -s /etc/nginx/sites-available/n8n /etc/nginx/sites-enabled/Test config:
nginx -t
If successful, reload:
systemctl reload nginxNow try visiting: http://yourdomain.com
It should open n8n.

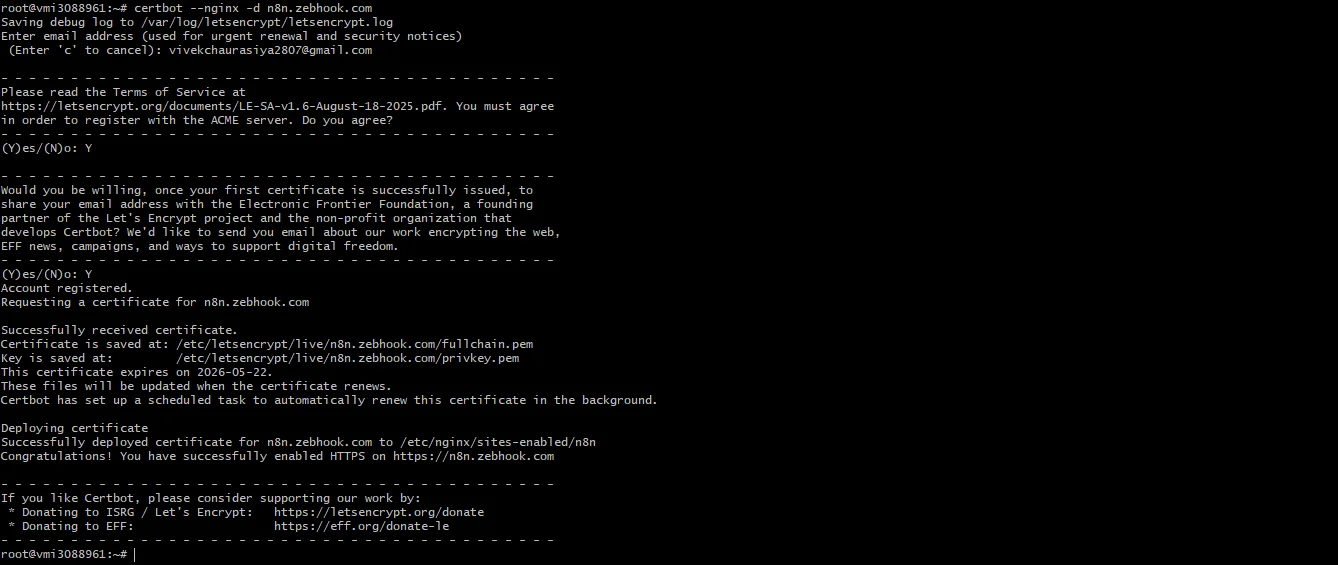
Step 10: Install SSL (Let’s Encrypt)
Install Certbot: Using this command
apt install certbot python3-certbot-nginx -yNow genrate SSL for the domain with this command:
certbot --nginx -d yourdomain.comFollow prompts:
- Enter email
- Agree to terms
- Choose redirect to HTTPS (recommended)
Once done, Certbot will automatically modify Nginx config.
Step 11: Final Step – Secure n8n for HTTPS
Now edit your docker-compose.yml
Remove:
– N8N_SECURE_COOKIE=false
Add:
– N8N_HOST=yourdomain.com
– N8N_PROTOCOL=https
– WEBHOOK_URL=https://yourdomain.com/
Your final docker-compose.yml file should look like this

Then restart containers:
docker compose down
docker compose up -d
now try to access the n8n with your domain in the browser

Now your n8n served on ssl
Why Docker Is the Industry Standard for Self-Hosting
- Consistent environments across servers
- Easy upgrades and rollbacks
- Isolated dependencies
- Widely adopted in production DevOps
Why PostgreSQL Is Better Than SQLite for Production n8n
- Handles high workflow execution volume
- Prevents database locking issues
- Safer for concurrent workflows
- Better crash recovery and data integrity
When This Method Makes Sense
- You are comfortable with Linux and CLI
- You want full control over the environment
- You prefer manual server management
Pros of Docker-Based n8n Hosting
- Full customization and flexibility
- Production-ready architecture
- No dependency on hosting panels
Cons of Docker-Based n8n Hosting
- Everything managed via command line
- Manual setup of backups and monitoring
- Higher learning curve for non-DevOps users
Method 3 – Self-Hosting n8n Using Docker, PostgreSQL, and aaPanel (Recommended)
While running n8n directly with Docker provides full control over the environment, managing databases, backups, SSL certificates, and server resources purely through the command line can become difficult as your automation infrastructure grows.
This is where combining Docker with a server management panel like aaPanel becomes highly practical.
In this setup:
- Docker runs and isolates the n8n application
- PostgreSQL stores workflow executions, credentials, and system data
- aaPanel simplifies server management, database administration, and software installation
This combination provides the flexibility of Docker with the operational convenience of a graphical server panel, making it a strong choice for freelancers, automation agencies, and businesses running multiple workflows.
Steps to Self-Host n8n Using Docker, PostgreSQL, and aaPanel
Step 1: Purchasing and preparing a VPS
If you have not purchased a VPS yet, you can follow the steps explained earlier in the Method 1 – One-Click n8n Installation from Hosting Providers section. The VPS preparation process is the same, except here you should choose a clean Ubuntu server instead of the pre-installed n8n template.
Refer to the Getting VPS from Contabo Section
Step 2: Install aaPanel on the VPS
To simplify server management, we will install aaPanel, a lightweight server control panel.
connect to the server using ssh with command
ssh root@your-server-ipStep 2.1 Visit aapanel site (click here)

Step 2.2: go to install aapanel free addition
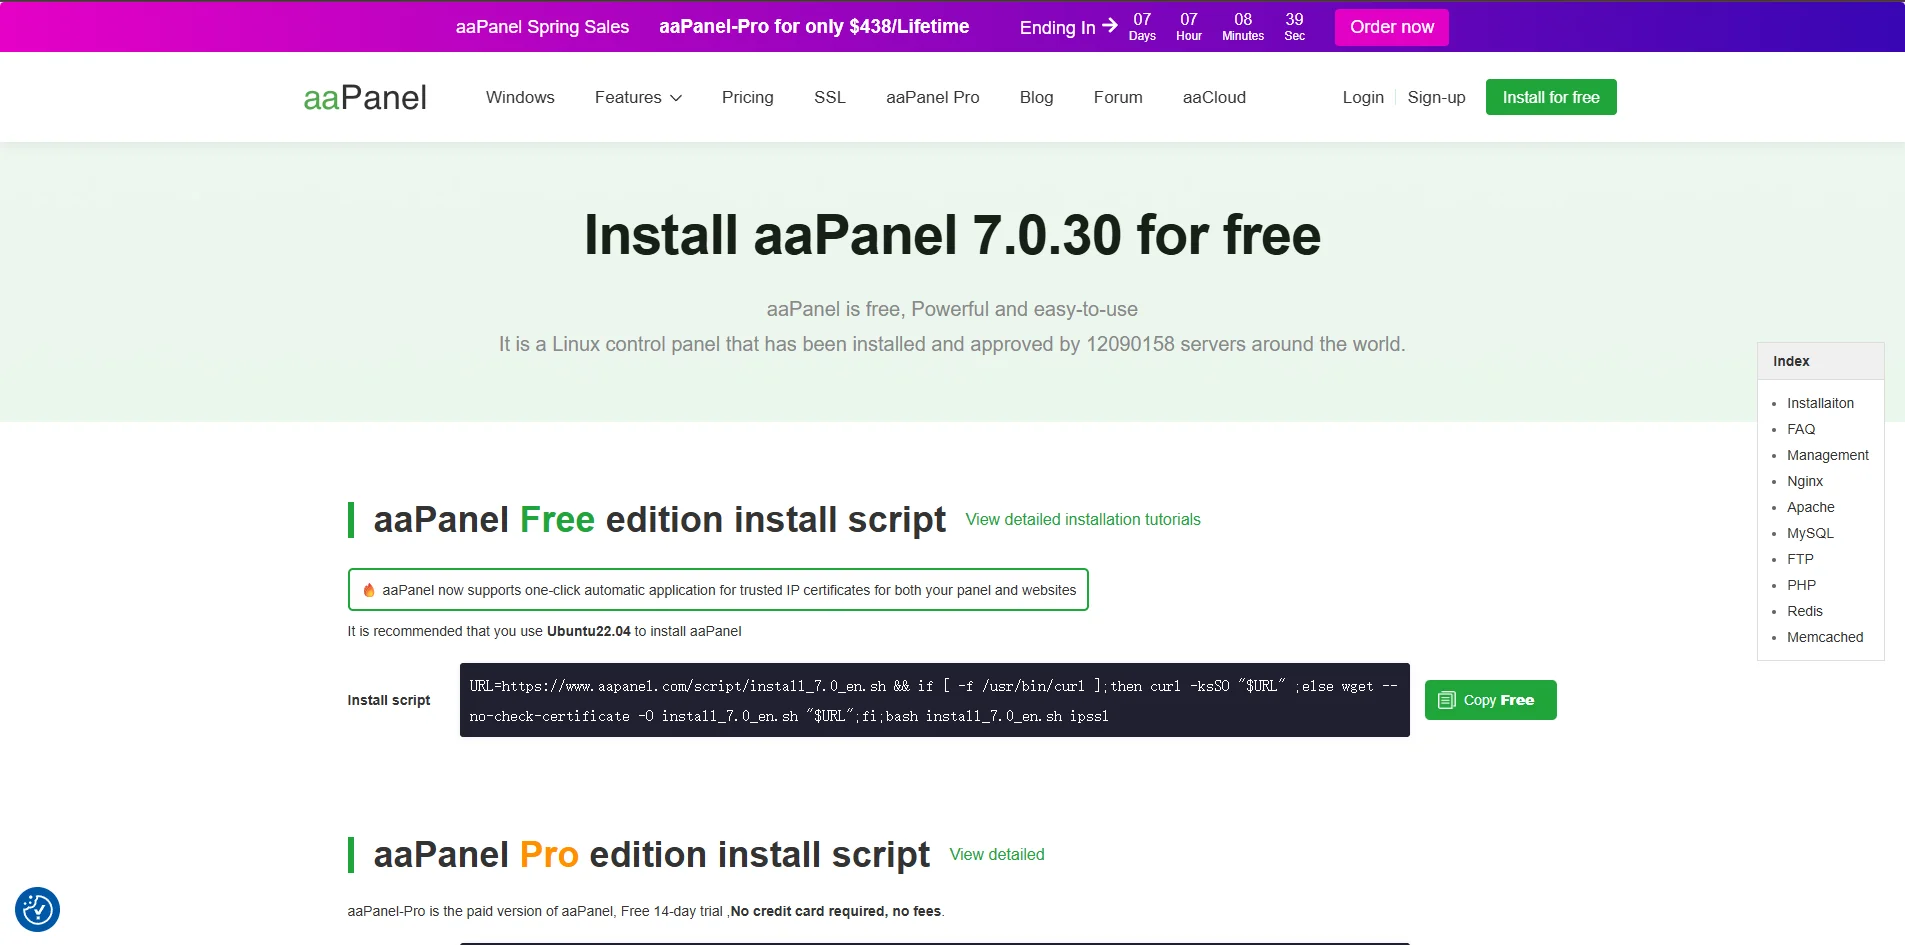
Copy the install script by clicking copy free button and then paste it into the terminal and hit enter

You will be prompted to accept the installation. Type y and hit enter

After installation completes, aaPanel will display:
- Login URL
- Username
- Password

Open the provided URL in your browser and log in to the aaPanel dashboard.
Step 3: Install the Required Base Services
When logging into aaPanel for the first time, you will be asked to install initial server components.
Select: Single Server Environment
Then install only:
✔ Nginx
Uncheck the following components since they are not required for this setup:
- MySQL
- Pure-FTPd
- PHP
- phpMyAdmin
Click One-Click Install to begin installation.

Step 4: Link Your Server to the aaPanel Account
To manage your server more easily, create an aaPanel account.
- Visit the official aaPanel website
- Click Sign Up
- Create your account
After registration, return to the aaPanel dashboard and log in using your new account credentials.

This allows aaPanel to link your VPS to your account and manage installed services more efficiently.
Step 5: Install Docker and PostgreSQL via aaPanel
Now we will install the software required for running n8n.
Install Docker
- Open Docker from the left sidebar
- Click Install
- Confirm the default installation method

aaPanel will automatically install:
- Docker Engine
- Docker Compose
After installation completes, you will see Docker running in the dashboard.
Install PostgreSQL
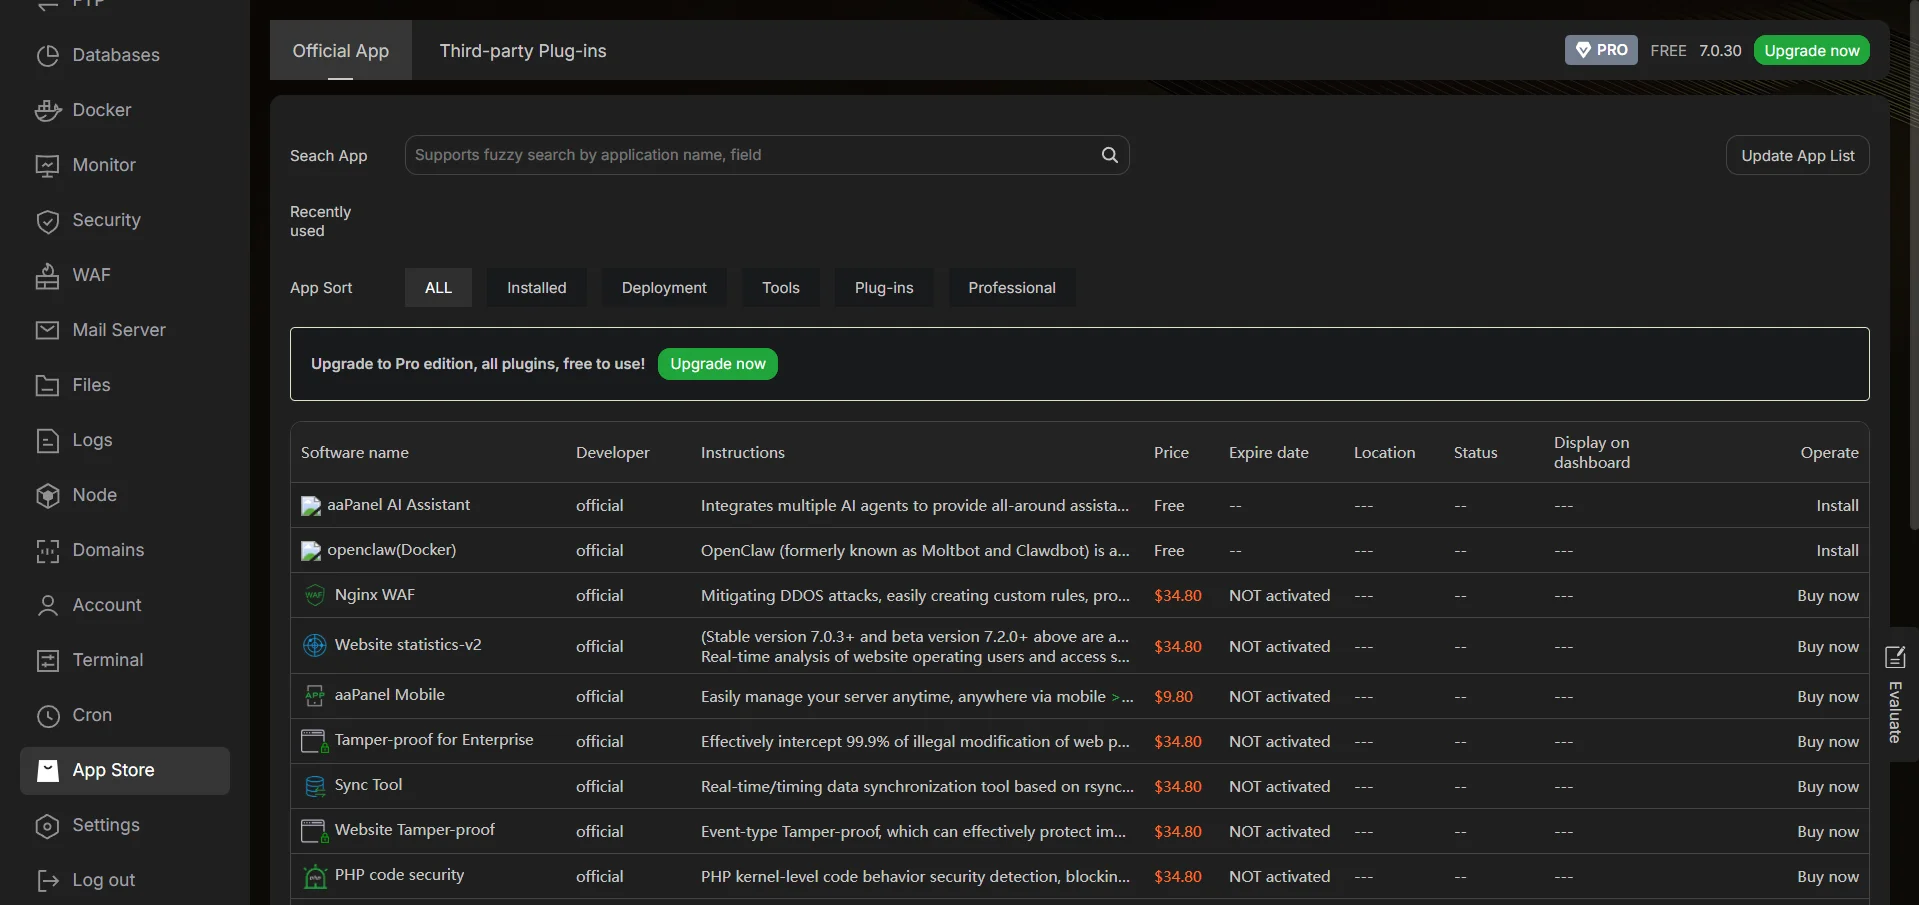
Next, install PostgreSQL from the aaPanel App Store.
Steps:
- Open App Store
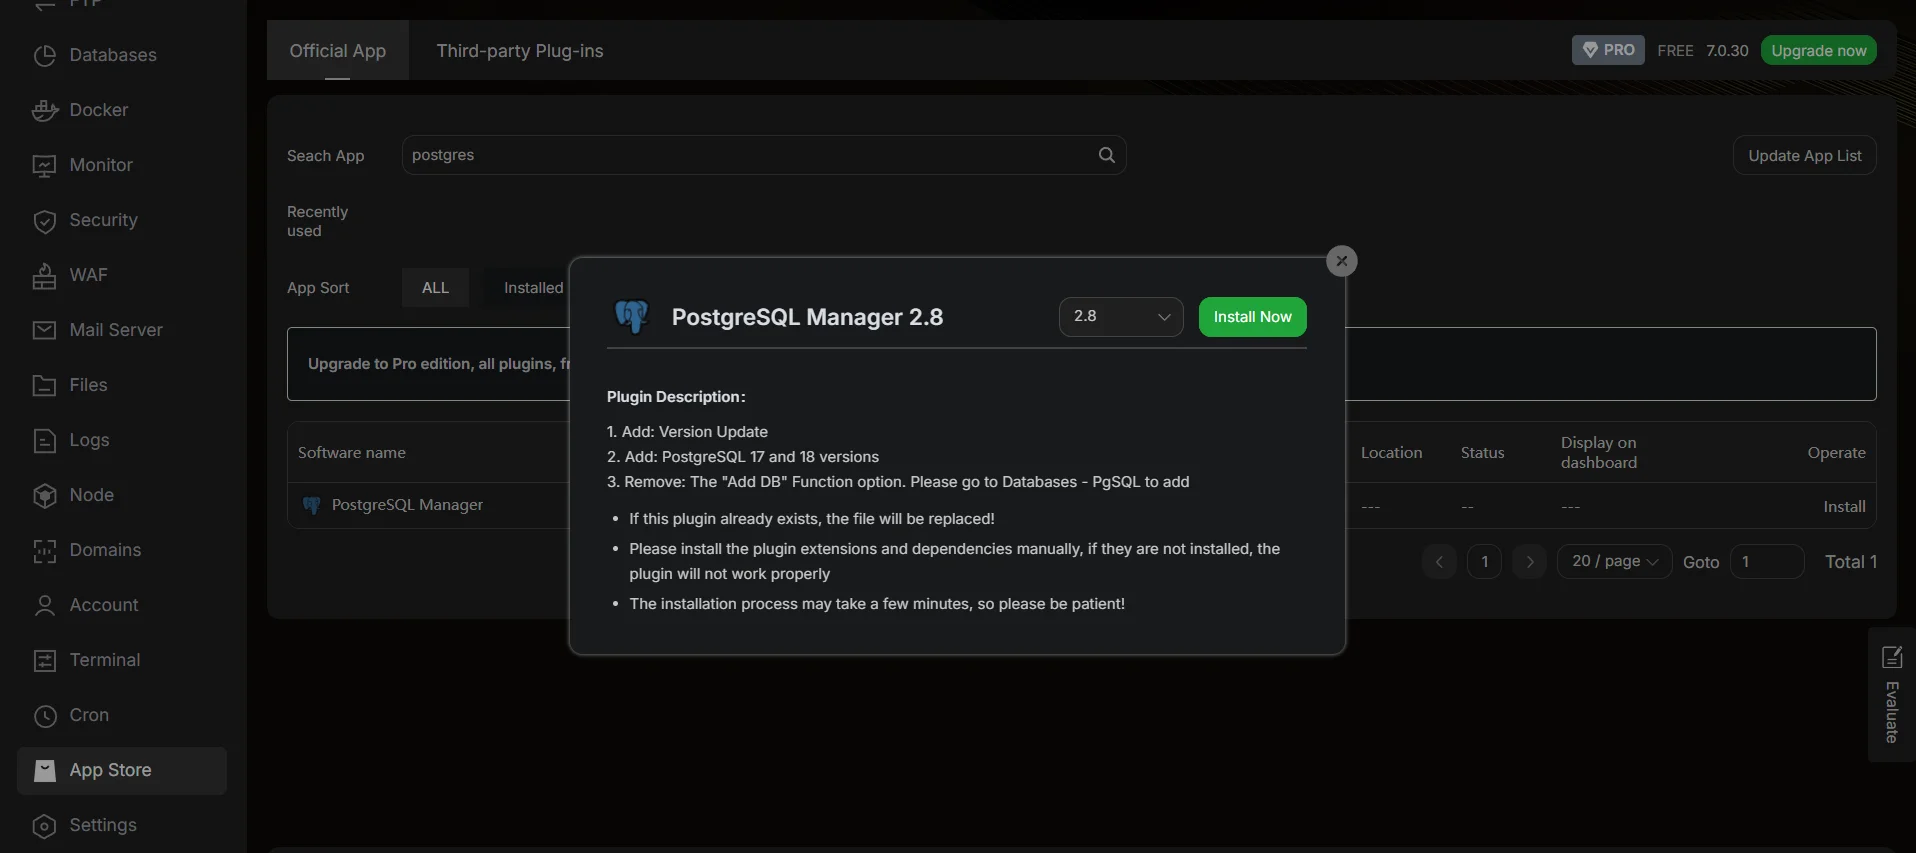
- Search for PostgreSQL Manager
- Click Install

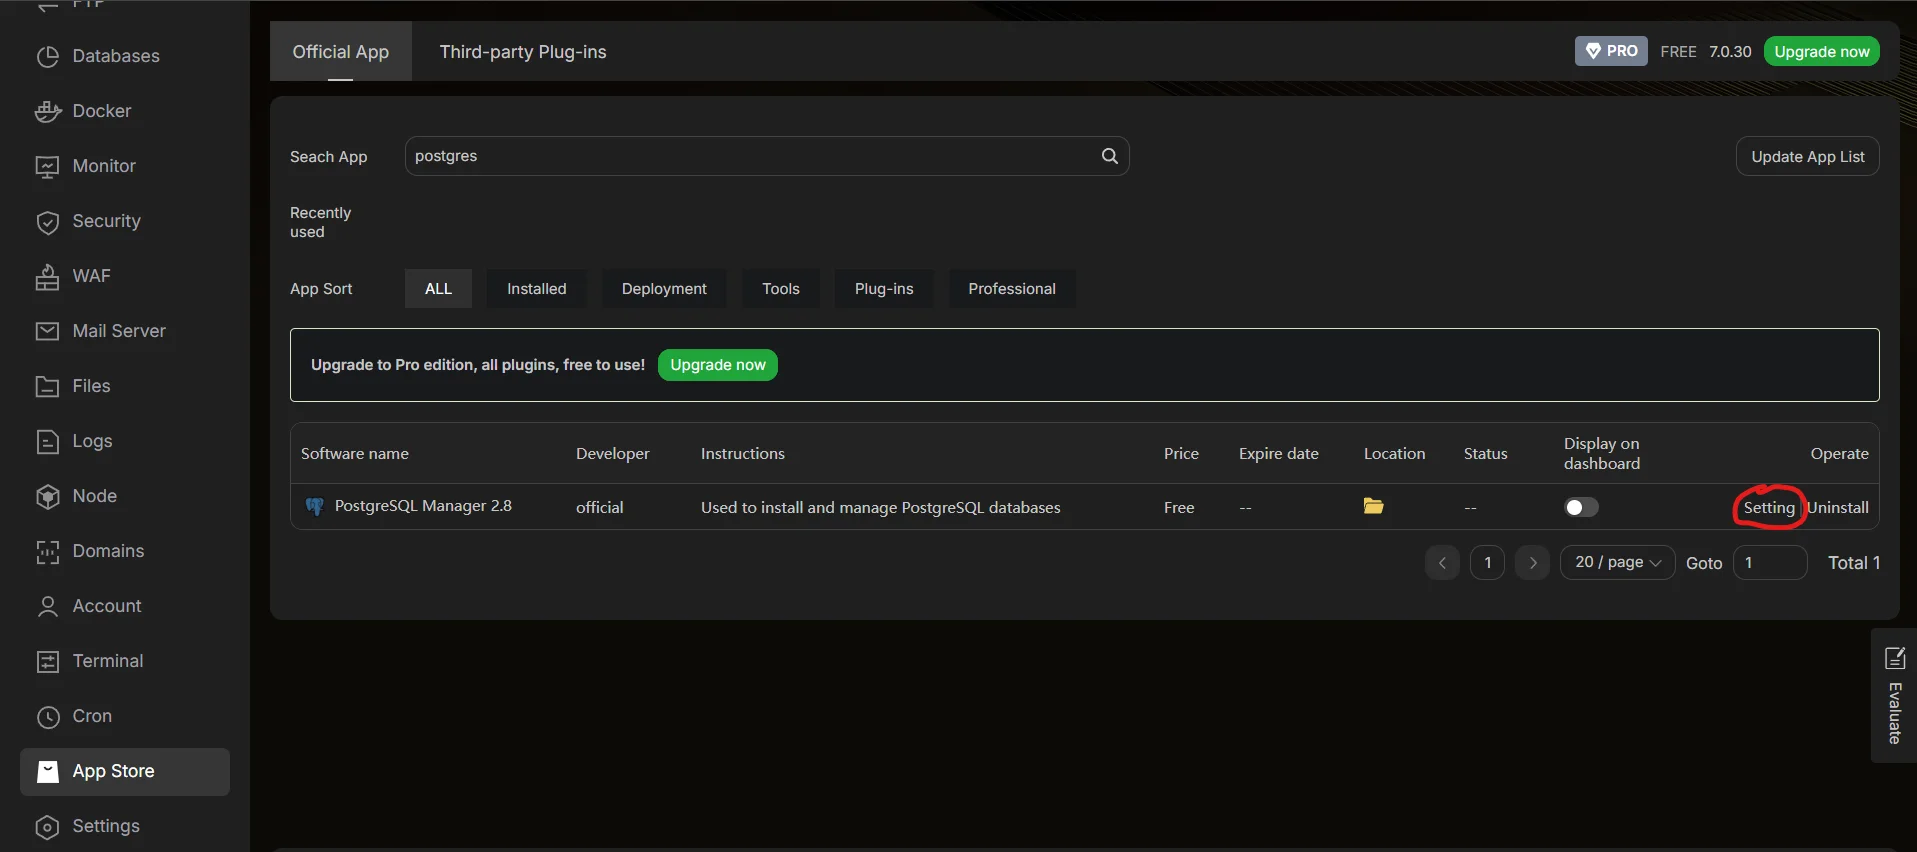
After installation:
- Open PostgreSQL Manager
- Navigate to Settings
- Install PostgreSQL version 16 (LTS recommended)
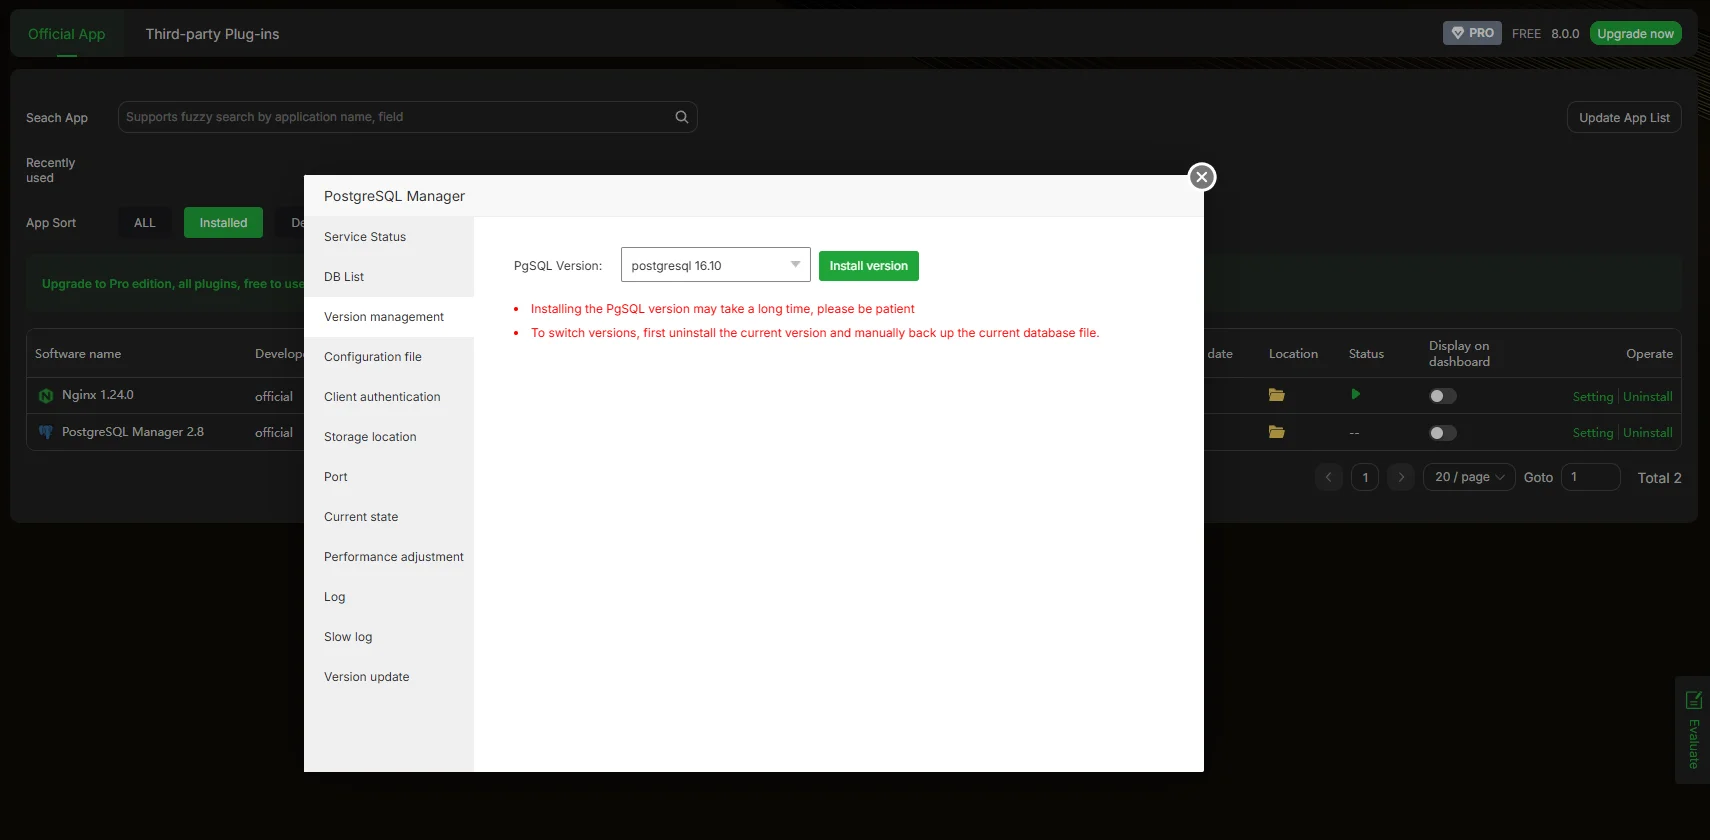
Step 6: Configure PostgreSQL for Docker Connectivity
By default PostgreSQL only accepts connections from localhost.
To allow Docker containers to connect to the database, two configurations are required.
Enable External Listening
Open the configuration file in the postgreSQL manager and find:
#listen_addresses = ‘localhost’’
Change it to
listen_addresses = ‘*’
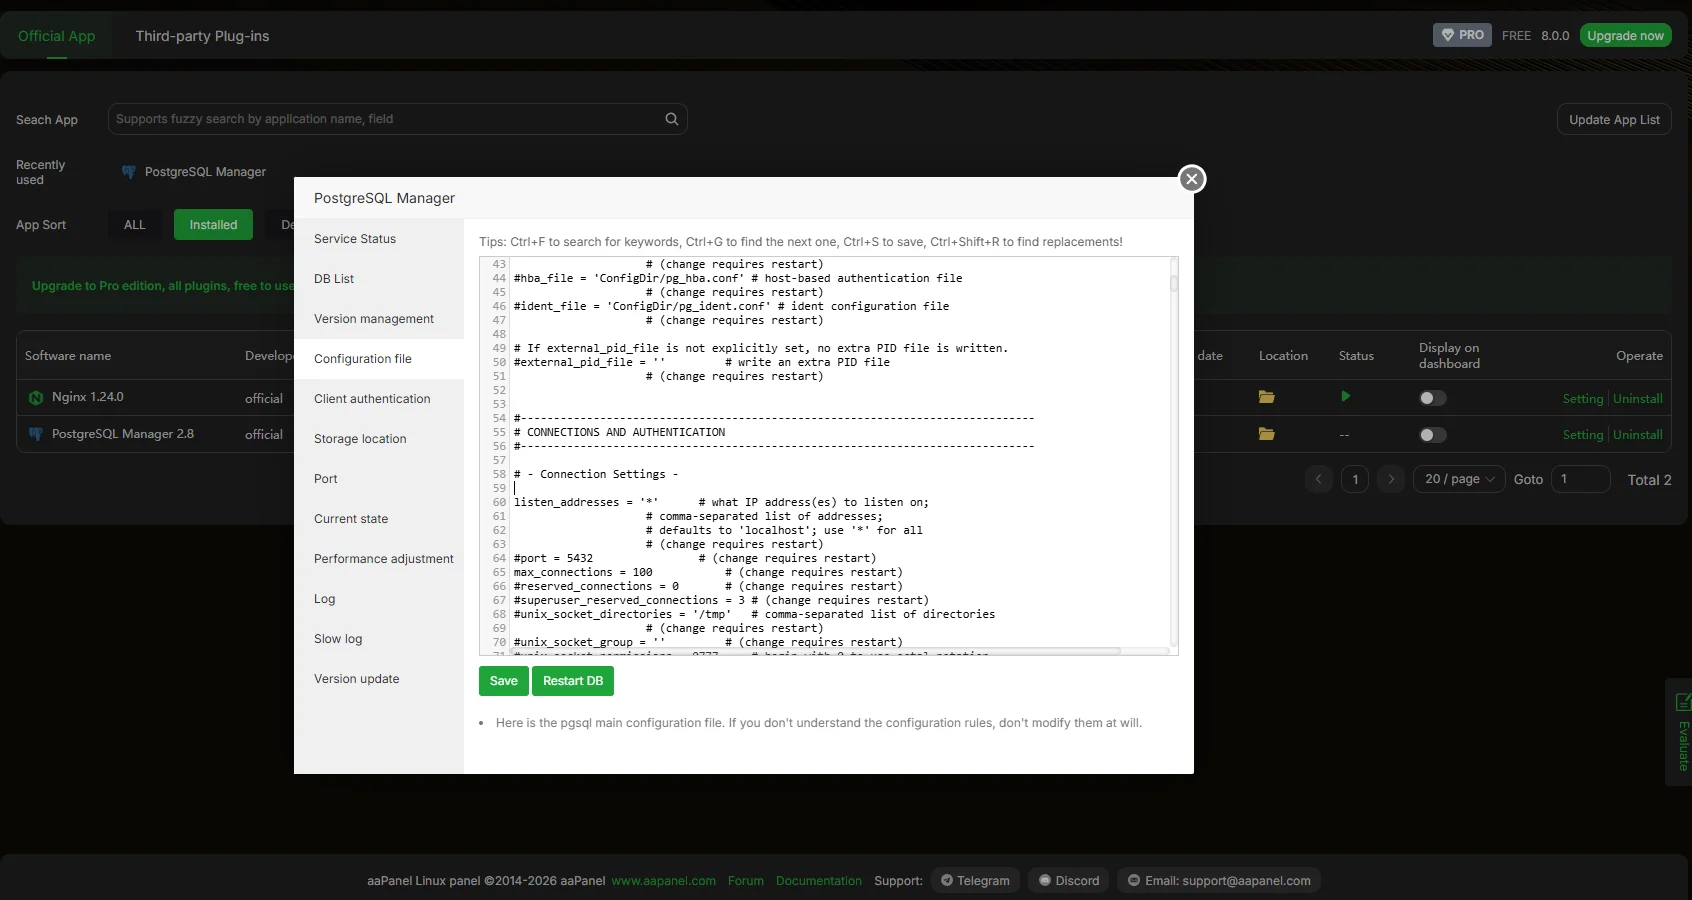
Allow Docker Network Connections
Next open Client Authentication
Add a rule allowing connections from Docker networks:
host all all 172.19.0.0/16 md5
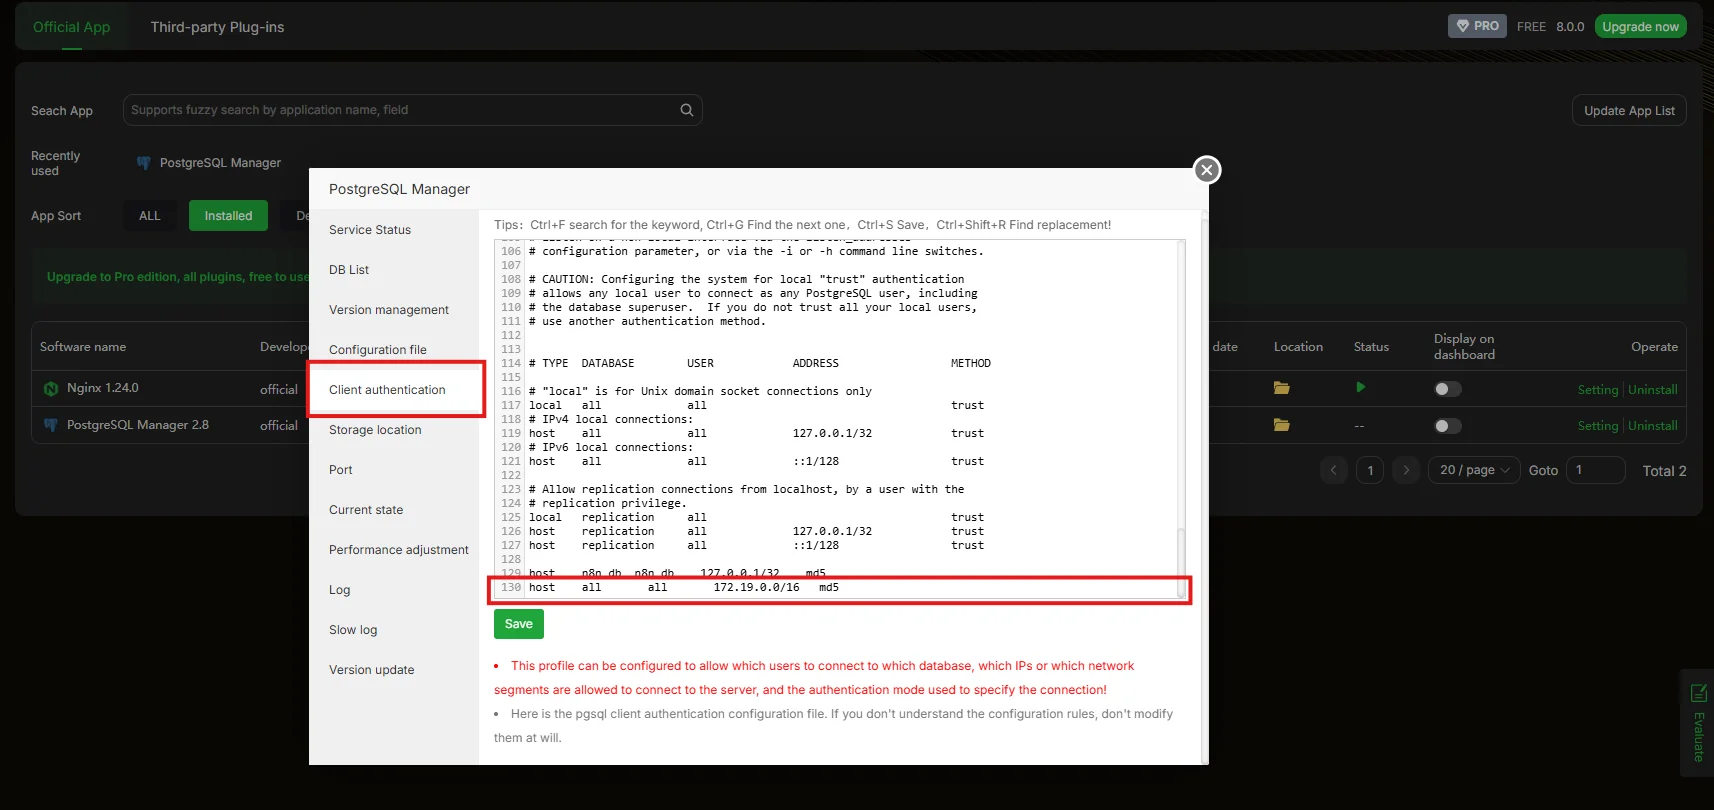
Save the configuration and restart PostgreSQL.

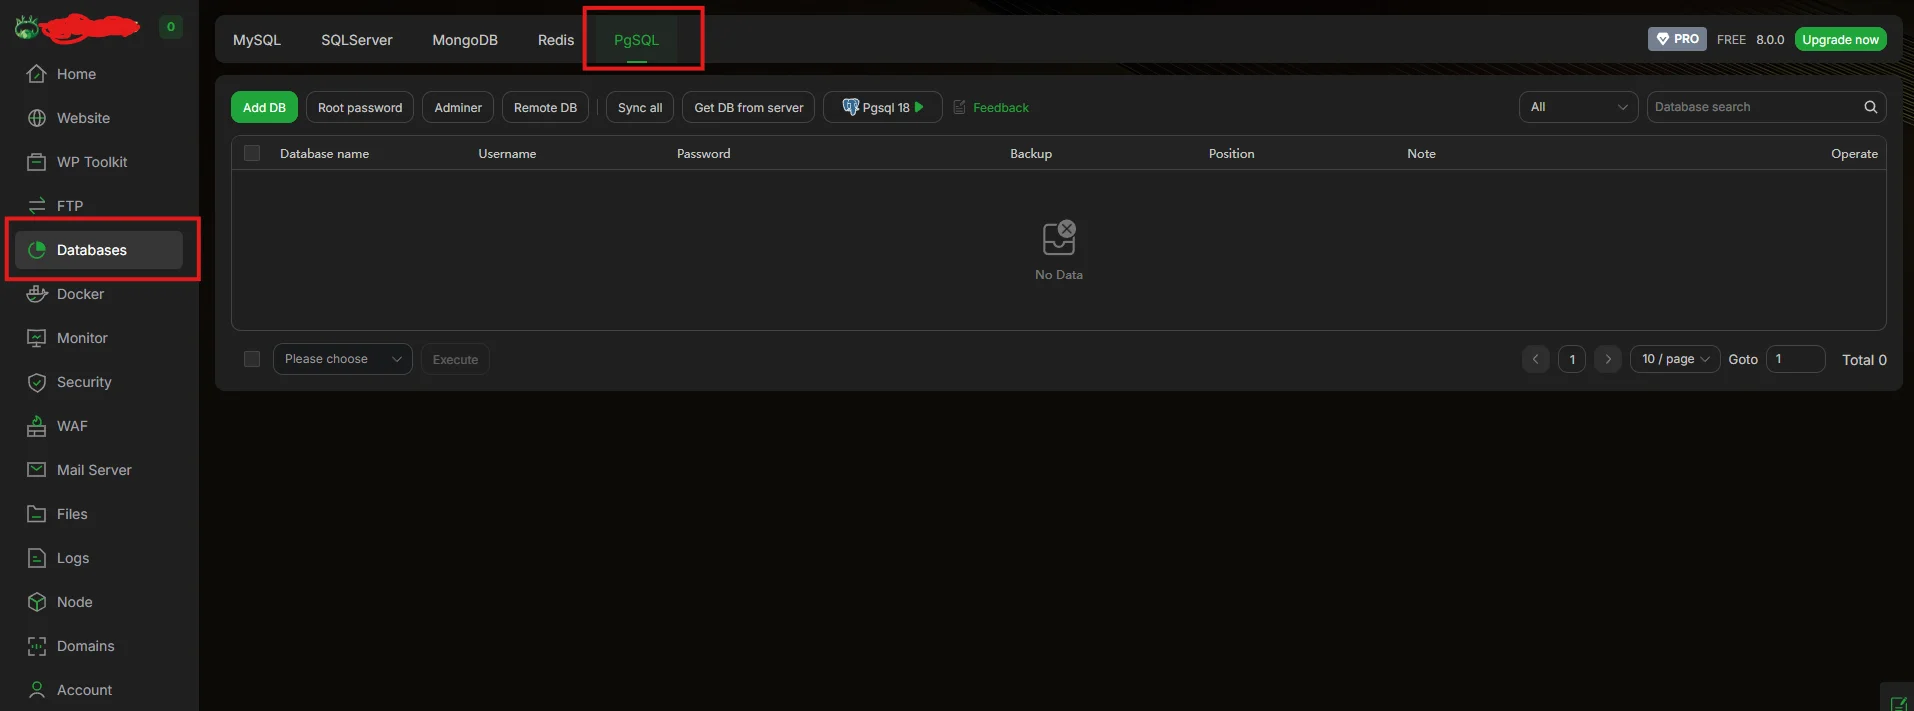
Step 7: Create a PostgreSQL Database for n8n
Inside aaPanel:
- Open the Database section
- Go to the PgSQL tab
- Click Add Database
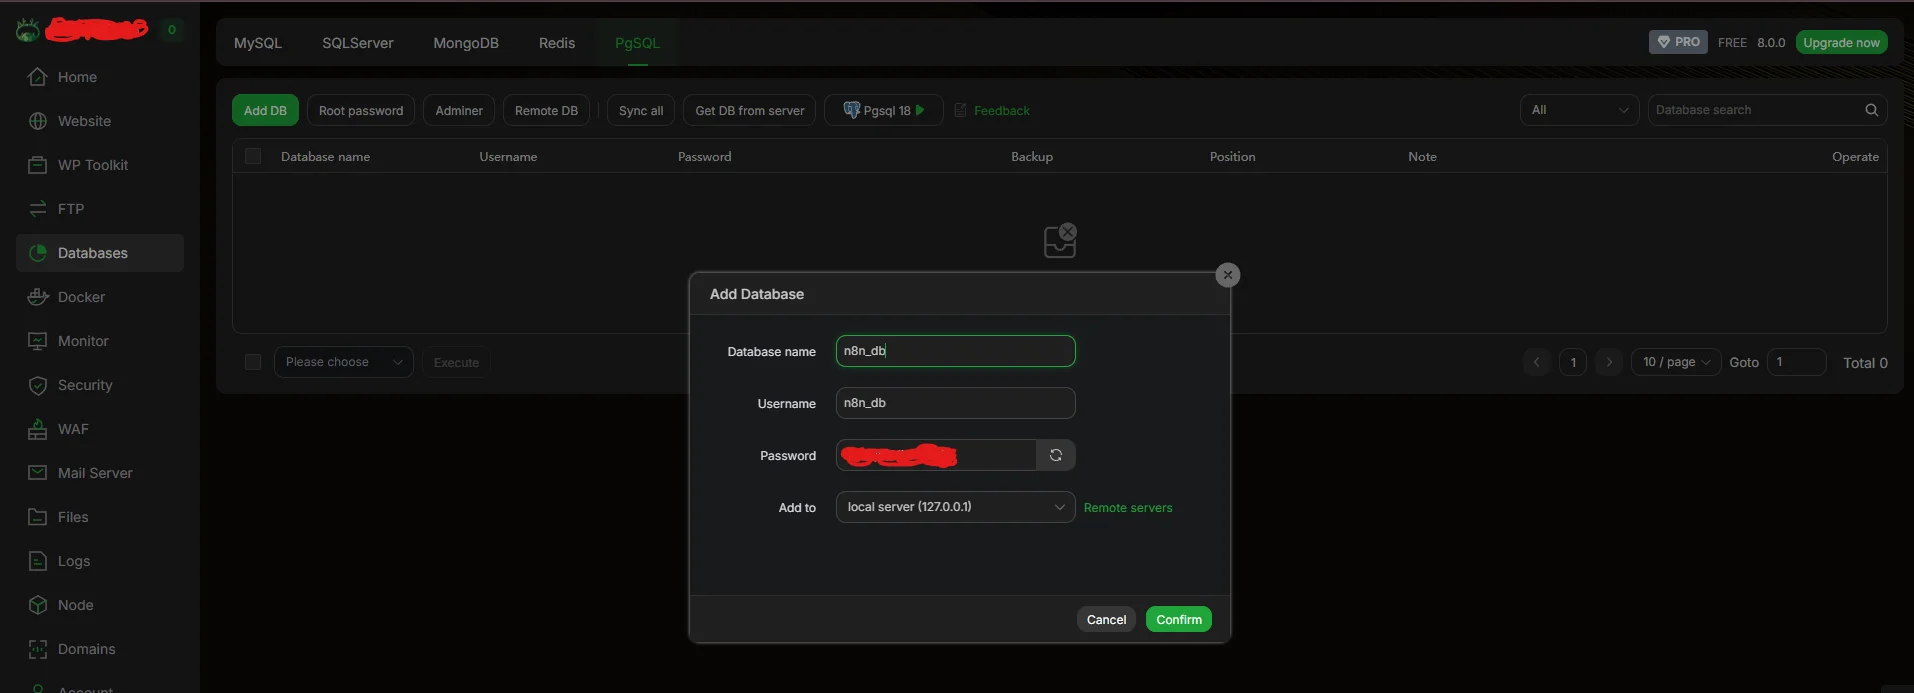
Create:
- Add database name
- Add database username
- Add password and click confirm it will create a database under PgSQL.
Step 8: Install Required PostgreSQL Extensions
n8n requires the uuid-ossp extension for generating UUID values.
So go to the terminal in the aapanel and first install the pgsql client with command
apt install postgresql-client -y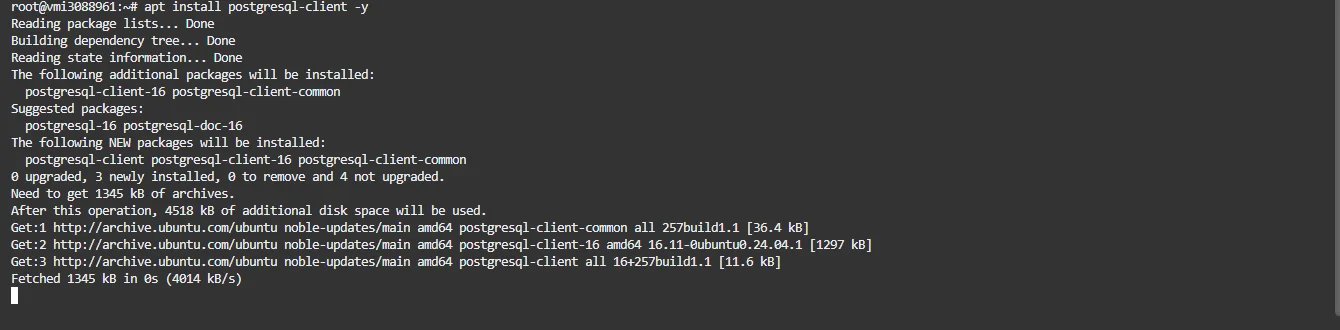
After pgsql client installed successfully install the pgsql contrib
apt install postgresql-contribThen we have to copy paste some files from that contrib to the pgsql installation. So run these command one by one.
cp /usr/share/postgresql/16/extension/uuid-ossp* /www/server/pgsql/share/extension/
cp /usr/lib/postgresql/16/lib/uuid-ossp.so /www/server/pgsql/lib/
cp /usr/share/postgresql/16/extension/uuid-ossp--*.sql /www/server/pgsql/share/extension/
Then restart the pgsql with command
Systemctl restart pgsqlThen install the extension first connect to the pgsql with command
psql -U postgres -d n8n_db -h 127.0.0.1 -p 5432Change n8n_db with your database name

It will connect to the database now we will install the uuid-ossp extension
Run the command
CREATE EXTENSION IF NOT EXISTS "uuid-ossp";
Now the extension is successfully installed so exit form the pgsql by command:
\q + enter
And restart the pgsql with command
Systemctl restart pgsqlStep 9: Create the n8n Docker Compose Setup
Now we will deploy the n8n container.
Open the terminal in aapanel

Create a project directory and also the n8n data directory inside of the project directory:
Cd /opt
mkdir n8n
mkdir n8n_data
chown -R 1000:1000 n8n_data
cd n8n
Create the compose file:
Run the command
nano docker-compose.ymlPaste this docker compose file for n8n
services:
  n8n:
    image: n8nio/n8n:latest
    container_name: n8n_app
    restart: always
    ports:
      - "5678:5678"
    environment:
      - DB_TYPE=postgresdb
      - DB_POSTGRESDB_HOST=your_vps_ip_address
      - DB_POSTGRESDB_PORT=5432
      - DB_POSTGRESDB_DATABASE=n8n
      - DB_POSTGRESDB_USER=n8n_user
      - DB_POSTGRESDB_PASSWORD=your_password
      - N8N_SECURE_COOKIE=false
      - N8N_ENCRYPTION_KEY=your_generated_key
    volumes:
      - /opt/n8n/n8n_data:/home/node/.n8n
Now before saving change the
-DB_POSTGRESDB_HOST with your vps ip address
And
– DB_POSTGRESDB_DATABASE
– DB_POSTGRESDB_USER
– DB_POSTGRESDB_PASSWORD
With the database details which we have created in the previous step
And add the
–N8N_ENCRYPTION_KEY with the encryption key
Since right now we are installing the n8n without any domain and ssl so we have added this environment
– N8N_SECURE_COOKIE=false
In the next steps we will connect a domain with our n8n and add an ssl to it then will remove this environment
Now save and with command CTRL+X and then Enter
Step 10: Start the n8n Container
Run
docker compose up -dDocker will:
- pull the n8n image
- create the container
- connect it to PostgreSQL
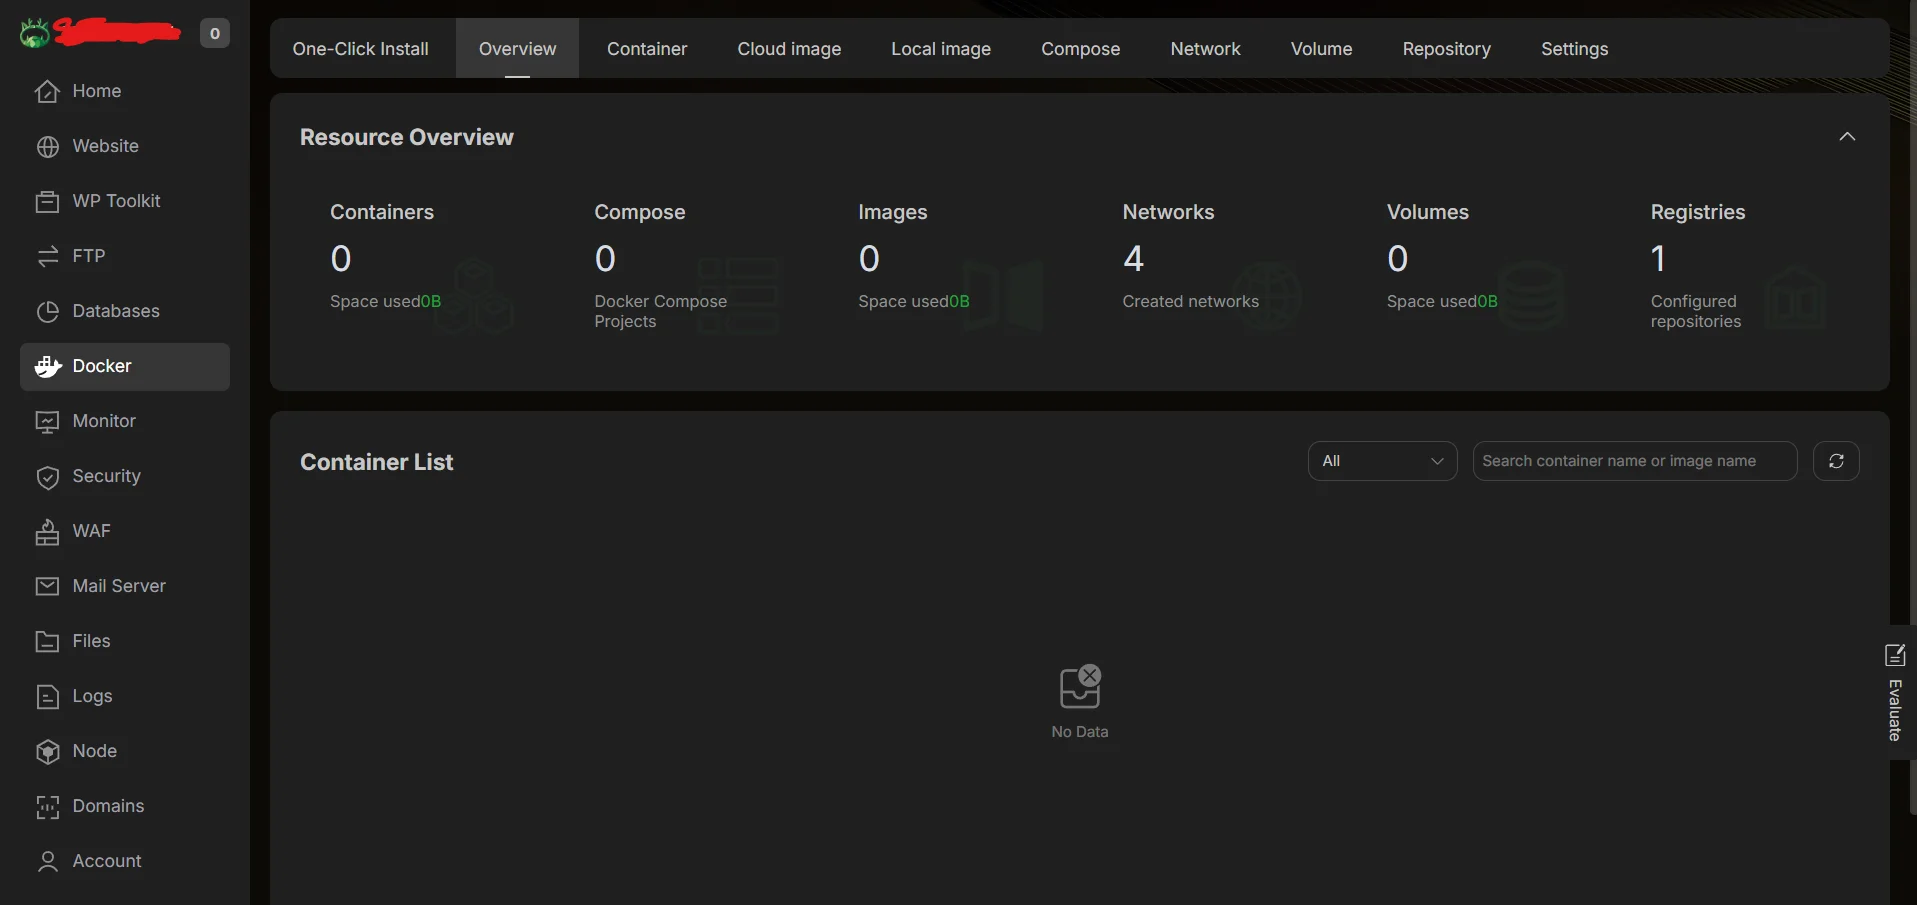
To see whether n8n container is created or not
Go to the docker tab in the aapanel and the click the container tab in the top header
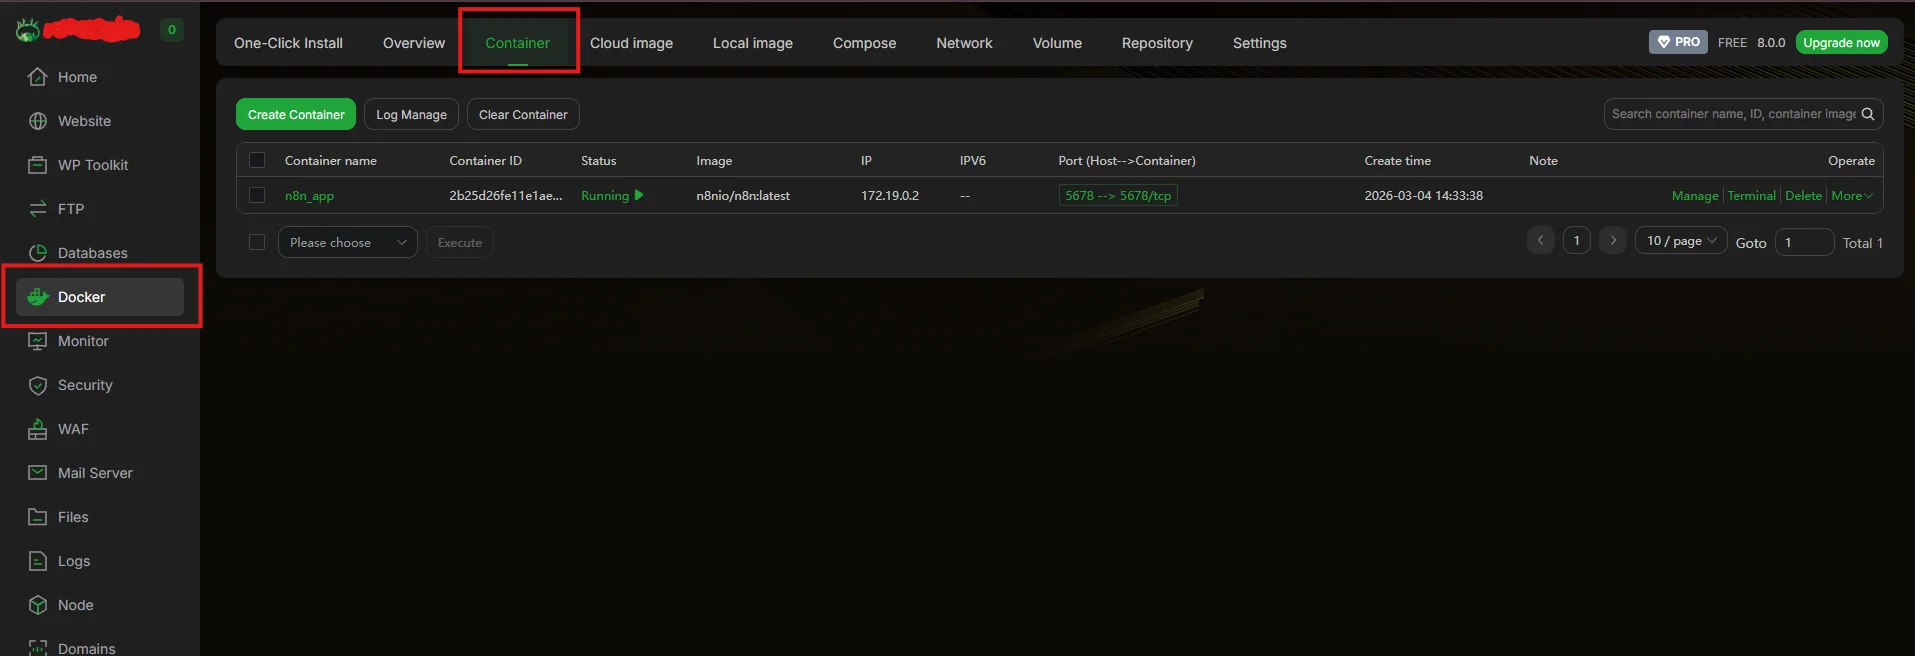
You will see the n8n container
Now check its log whether its running or not click on the manage option in the n8n container

You will see this log means n8n is successful self hosted and running, to access it open this in the new tab in your browser
http://your-server-ip:5678

You will see the n8n setup screen where you can create your administrator account.
Your self-hosted n8n instance is now successfully running.
Step 11: connecting domain and adding ssl to n8n hosted with docker and aapanel
At this stage, your n8n instance is running on the server and accessible via:
http://your-server-ip:5678
However, accessing n8n through an IP address is not recommended for production use.
To make the instance secure and easier to access, we will:
- Connect a custom domain to the server
- Configure a reverse proxy using aaPanel
- Enable SSL using Let’s Encrypt
- Update the Docker configuration for HTTPS
Step 11.1 Create a Reverse Proxy in aaPanel
Open your aaPanel dashboard and navigate to:
Websites → Proxy Project
Click Add Proxy Project.

Fill in the following details:

Domain Name
Before proceeding, make sure that your domain is already pointing to your VPS.
Add an A record in your domain DNS:
| Record type | Host | Value |
| A | @ or subdomain | Your vps ip address |
Example:
n8n.yourdomain.com → VPS IP
Next configure the proxy target.
Target URL
http://127.0.0.1:5678
This tells aaPanel to forward all incoming domain traffic to the n8n container running on port 5678. Click Confirm to create the proxy.

Your domain is now connected to the n8n service.
Step 11.2: Enable SSL Using Let’s Encrypt
To secure your n8n instance with HTTPS:
In the same proxy project tab screen
Click on the modify option in the domain

Click on the ssl tab
Select:
Let’s Encrypt
Choose your domain and click Apply.
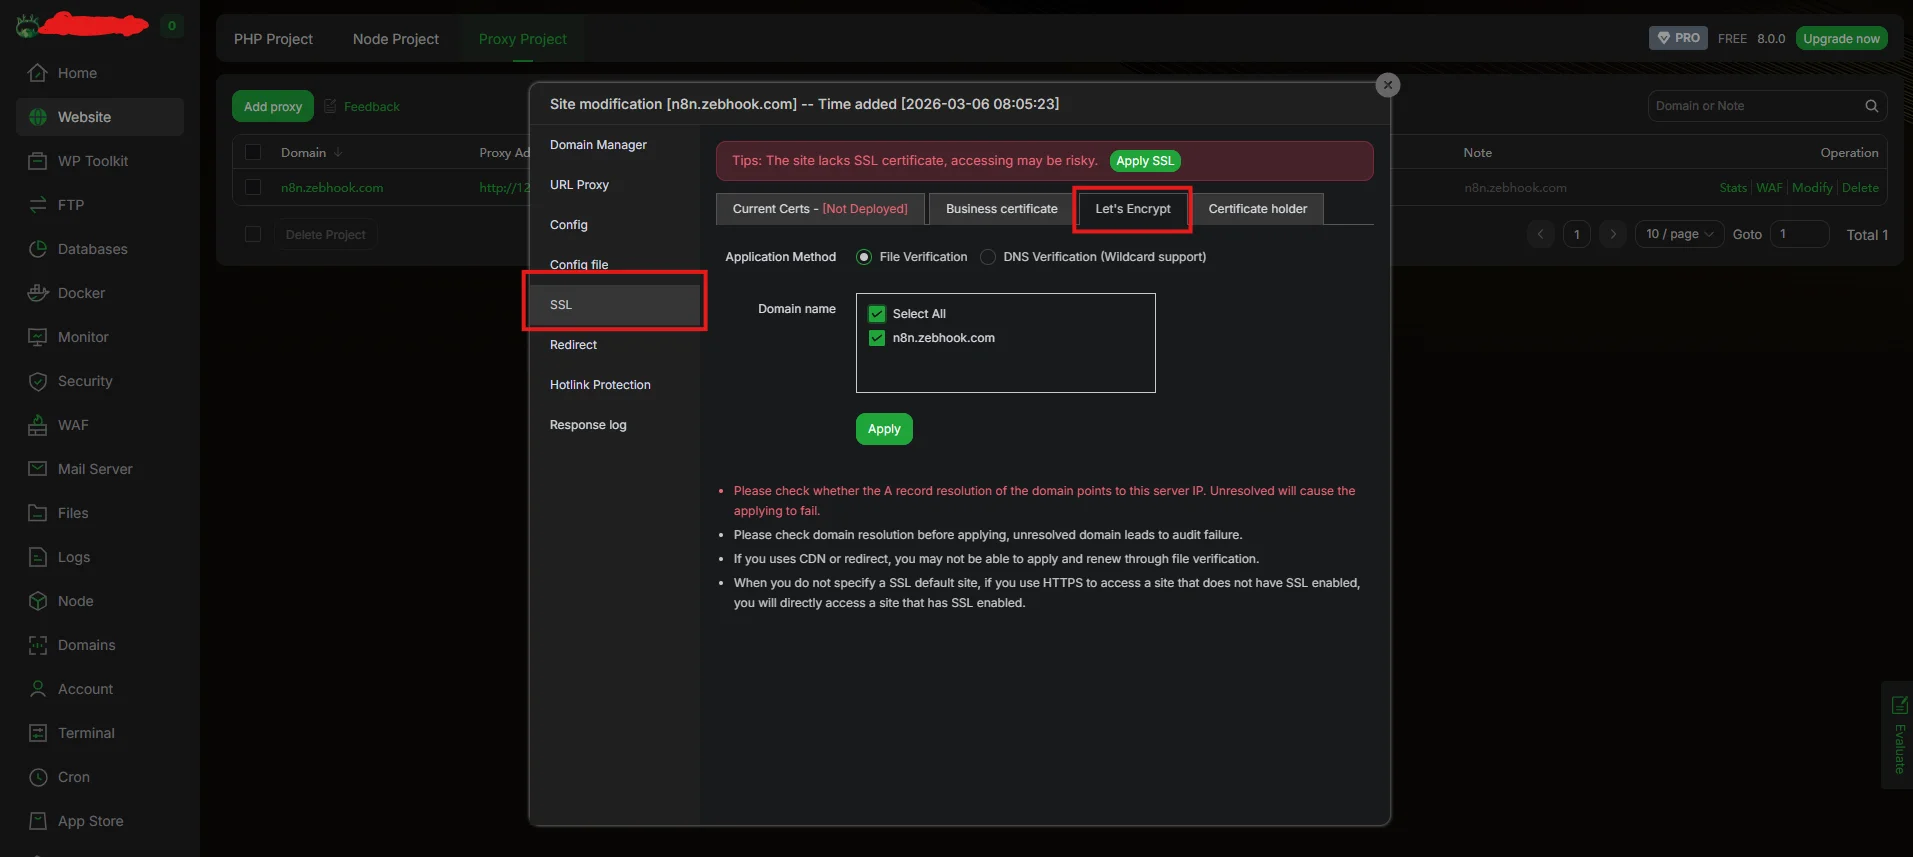
aaPanel will automatically:
- Generate an SSL certificate
- Install it for the domain
- Configure HTTPS redirection

Step 11.3: Update the Docker Configuration for HTTPS
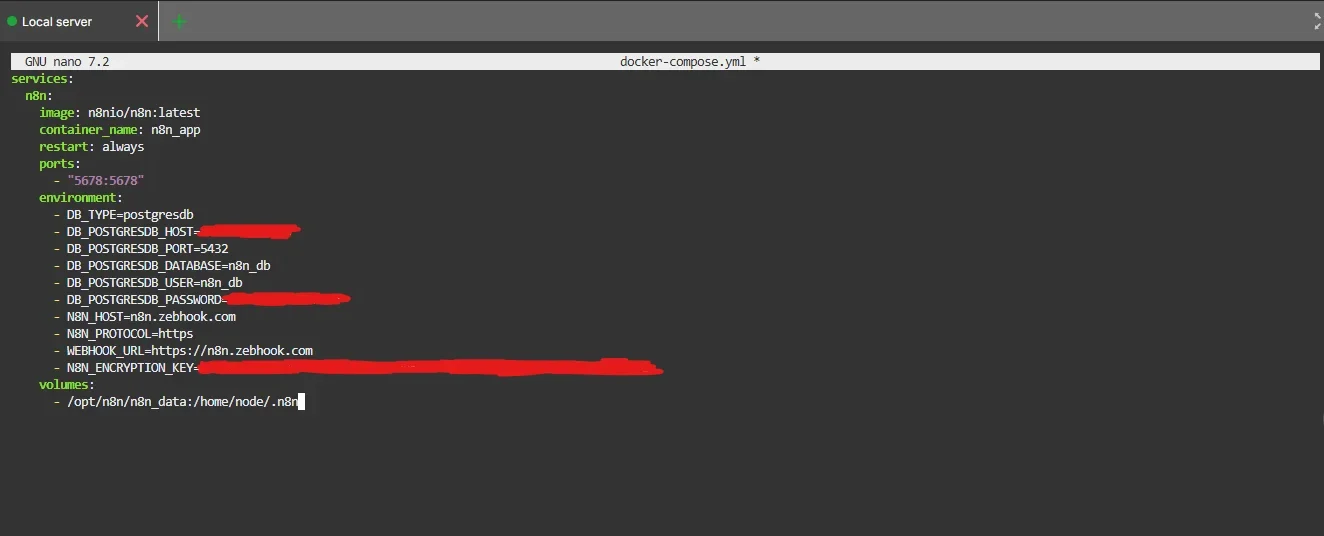
Now that the domain and SSL certificate are active, we need to update the n8n configuration to work correctly with HTTPS.
Open the server terminal in the aapanel and navigate to the n8n directory:
cd /opt/n8nEdit the Docker Compose file:
nano docker-compose.yml
Remove the Temporary Cookie Configuration
Delete this line:
– N8N_SECURE_COOKIE=false
This option was only required when running n8n without SSL.
Add HTTPS Configuration Variables
Add the following environment variables:
– N8N_HOST=yourdomain.com
– N8N_PROTOCOL=https
– WEBHOOK_URL=https://yourdomain.com/
These variables ensure that:
- n8n generates secure URLs
- webhook endpoints use HTTPS
- cookies are handled securely
Final docker compose file should look like this
Step 11.4: Restart the n8n Containers
After saving the file, restart the containers.
Stop the running containers:
docker compose downStop the running containers:
docker compose up -dDocker will reload the updated configuration.

Step 11.5: Access n8n Using Your Domain
Open your browser and visit: https://yourdomain.com

You should now see the n8n login or setup screen, running securely over HTTPS.
Why Docker + PostgreSQL + aaPanel Is the Best Production Setup
When deploying n8n for experimentation or small workflows, simple setups such as one-click installations or SQLite-based deployments can work. However, when automation becomes part of real business operations, reliability, scalability, and maintainability become critical.
A production-ready n8n environment must ensure that workflows run consistently, database operations remain stable under load, and server management does not become unnecessarily complex.
Combining Docker, PostgreSQL, and aaPanel creates a balanced architecture that solves these challenges effectively.
In this setup:
- Docker manages the application environment and container lifecycle
- PostgreSQL provides a reliable database for workflow executions and credentials
- aaPanel simplifies server administration, SSL management, and database operations
Together, these three components provide a stable, scalable, and manageable infrastructure for self-hosting n8n in production environments.
How Docker Ensures Stability and Easy Upgrades
Docker plays a central role in modern application deployment by packaging software and its dependencies into isolated containers.
Instead of installing applications directly on the server, Docker runs them in controlled environments, which makes deployments more predictable and easier to maintain.
For n8n hosting, Docker provides several advantages:
Consistent environments
Docker ensures that n8n runs the same way across different servers. The container includes all required dependencies, eliminating compatibility issues that often occur with traditional installations.
Simple upgrades
Updating n8n becomes straightforward. Instead of manually upgrading packages, you only need to pull the latest Docker image and restart the container.
This significantly reduces downtime and upgrade complexity.
Isolation from the host system
Containers isolate the application from the underlying operating system. If configuration issues occur, they can be resolved without affecting other services running on the server.
Rollback capability
If an update introduces unexpected issues, you can easily revert to a previous Docker image version.These advantages make Docker the industry-standard approach for deploying modern applications, including workflow automation platforms like n8n.
Why PostgreSQL Is Mandatory for Serious n8n Usage
n8n supports multiple database engines, including SQLite and PostgreSQL. While SQLite can be useful for testing or small personal setups, it is not designed for high-concurrency automation environments.
PostgreSQL is the recommended database for production deployments because it provides stronger reliability, performance, and scalability.
Better concurrency handling
n8n workflows often execute multiple tasks simultaneously. PostgreSQL is built to handle concurrent operations efficiently without causing database locking issues.
Improved data integrity
PostgreSQL uses advanced transaction management, which helps prevent data corruption during unexpected failures.
Scalability
As automation workloads grow, PostgreSQL can manage larger datasets and higher query volumes without significant performance degradation.
Reliable execution history
In production environments, maintaining workflow execution logs and credential data safely is essential. PostgreSQL ensures that this information remains consistent and recoverable.For these reasons, the official n8n documentation also recommends PostgreSQL for production deployments.
How aaPanel Simplifies Server and Database Management
While Docker handles application deployment and PostgreSQL manages data storage, server administration tasks can still become complex if everything is managed through the command line.
This is where aaPanel adds significant value.
aaPanel provides a web-based server management interface that simplifies many operational tasks.
Database management
You can create, manage, and monitor PostgreSQL databases through a visual interface rather than using command-line tools.
SSL certificate management
aaPanel integrates directly with Let’s Encrypt, allowing you to generate and renew SSL certificates with just a few clicks.
Reverse proxy configuration
Setting up domain routing for services such as n8n becomes much easier through aaPanel’s proxy configuration tools.
System monitoring
aaPanel provides real-time monitoring of server resources such as CPU usage, memory, disk space, and network activity.
Backup automation
Scheduling automated backups using cron jobs becomes simpler through the panel interface.
These features reduce the operational complexity of managing a production server while still allowing Docker to handle application-level control.
Who Should Use This Setup
The Docker + PostgreSQL + aaPanel architecture is best suited for users who want a reliable and manageable self-hosted automation environment.
This setup is particularly useful for:
Automation agencies
Teams that manage automation workflows for multiple clients need stable infrastructure and easy server management.
Freelancers offering automation services
Developers or consultants deploying n8n for businesses can maintain multiple client environments efficiently.
Businesses running internal automation systems
Organizations using n8n to automate operations, integrations, or internal workflows benefit from the reliability of this setup.
Teams managing production automation
Any environment where automation directly impacts operations, data flow, or customer interactions requires a stable and maintainable infrastructure.For these scenarios, the combination of Docker, PostgreSQL, and aaPanel provides an excellent balance between control, reliability, and ease of management.
Comparison Table – All n8n Self-Hosting Methods
Choosing the right deployment method for n8n depends on your technical expertise, infrastructure requirements, and how critical automation is to your business operations.
Some setups are designed for quick testing, while others are suitable for production environments where reliability, scalability, and data integrity are essential.
The table below compares the three most common ways to self-host n8n discussed in this guide.
n8n Self-Hosting Methods Comparison
| Feature | One-Click Hosting (Hostinger / Contabo) | Docker on VPS | Docker + PostgreSQL + aaPanel (Recommended) |
| Setup Difficulty | Very Easy | Moderate | Moderate |
| Technical Knowledge Required | Low | Medium | Medium |
| Installation Time | 5–10 minutes | 20–40 minutes | 30–60 minutes |
| Database Type | Usually SQLite | PostgreSQL | PostgreSQL |
| Scalability | Limited | High | High |
| Performance | Basic | Good | Excellent |
| Environment Control | Limited | Full Control | Full Control |
| Upgrade Process | Managed by provider or Manual | Manual Docker update | Docker update via panel or CLI |
| Server Management | Minimal / Command line only | Command line only | Visual panel + CLI |
| Domain Connection | Hard with manual configuration | Hard with manual configuration | Easy via aapanel |
| SSL Setup | Often automated | Manual configuration | Easy via aaPanel |
| Backup Management | Limited control | Manual scripts | Easy with panel + cron |
| Best Use Case | Testing or learning | Developers comfortable with CLI | Production workflows and automation systems |
| Vendor Lock-in | Yes (provider dependent) | No | No |
| Production Ready | Not recommended | Yes | Yes (Best option) |
Quick Recommendation
If you only want to experiment with n8n, a one-click installer is the fastest way to get started.
If you prefer full control over your server environment, running n8n directly with Docker on a VPS is a solid approach.
However, for most real-world automation use cases, combining Docker, PostgreSQL, and aaPanel provides the best balance between stability, scalability, and ease of management.
This setup allows you to maintain production-grade automation infrastructure without the operational complexity of managing everything purely through the command line.
How to Set Up Automatic Backups for n8n to Google Drive
Running n8n in production means your workflows, credentials, and execution history become critical business assets. If your server crashes or data becomes corrupted, losing this information can disrupt business automation processes.
For this reason, it is important to implement a reliable backup strategy.
In this section, we will configure automatic backups using aaPanel, allowing you to safely store your n8n data and restore it whenever necessary.
This backup process focuses on two key components:
- PostgreSQL database
- n8n persistent data volume
What Needs to Be Backed Up in n8n
To fully restore a self-hosted n8n instance, two important elements must be backed up.
1: PostgreSQL Database
The PostgreSQL database contains most of the important data used by n8n, including:
- Workflow definitions
- Credentials for external services
- Execution history
- Workflow settings and metadata
- User accounts and authentication data
If the database is lost, all configured workflows, credentials, and execution data will also be lost. For this reason, backing up the PostgreSQL database is the most important step in protecting your automation environment.
2: n8n Data Directory
In addition to the database, n8n stores important configuration files inside its data directory.
In our setup, this directory is mapped to:
/opt/n8n/n8n_dataThis folder is mounted inside the container as /home/node/.n8n, allowing the data to persist even if the container is recreated.
This directory typically contains:
- The encryption key used to secure credentials
- n8n configuration files
- Installed community nodes
- Local files used by workflows
The encryption key is especially critical. If you restore the database but lose this key, n8n will not be able to decrypt the stored credentials.
For this reason, you should also include the /opt/n8n/n8n_data directory in your backup strategy.
Backup Strategy for Self-Hosted n8n
A good backup strategy should follow these best practices.
Automated backups
Backups should run automatically on a schedule rather than relying on manual execution.
Multiple backup copies
Keeping multiple backup versions ensures that you can restore an older working state if necessary.
Easy restoration
Backup files should be easy to restore using simple commands or panel tools.
In this guide we will create:
- Automated PostgreSQL backups
- Optional volume backups
- Scheduled execution using aaPanel cron jobs
Automating n8n Backups Using aapanel Cron and Google Drive
To ensure that your n8n workflows and database remain safe, it is recommended to store automated backups in an external location such as Google Drive. This protects your data even if the server experiences hardware failure or accidental data loss.
In this section, we will configure automatic database and volume backups using aaPanel’s Cron system and Google Drive integration.
The process involves three main steps:
- Connecting Google Drive to aaPanel
- Creating an automated PostgreSQL database backup
- Creating an automated backup of the n8n data directory
Step 1: Connect Google Drive to aaPanel
Before creating backup tasks, aaPanel must be connected to your Google Drive account.
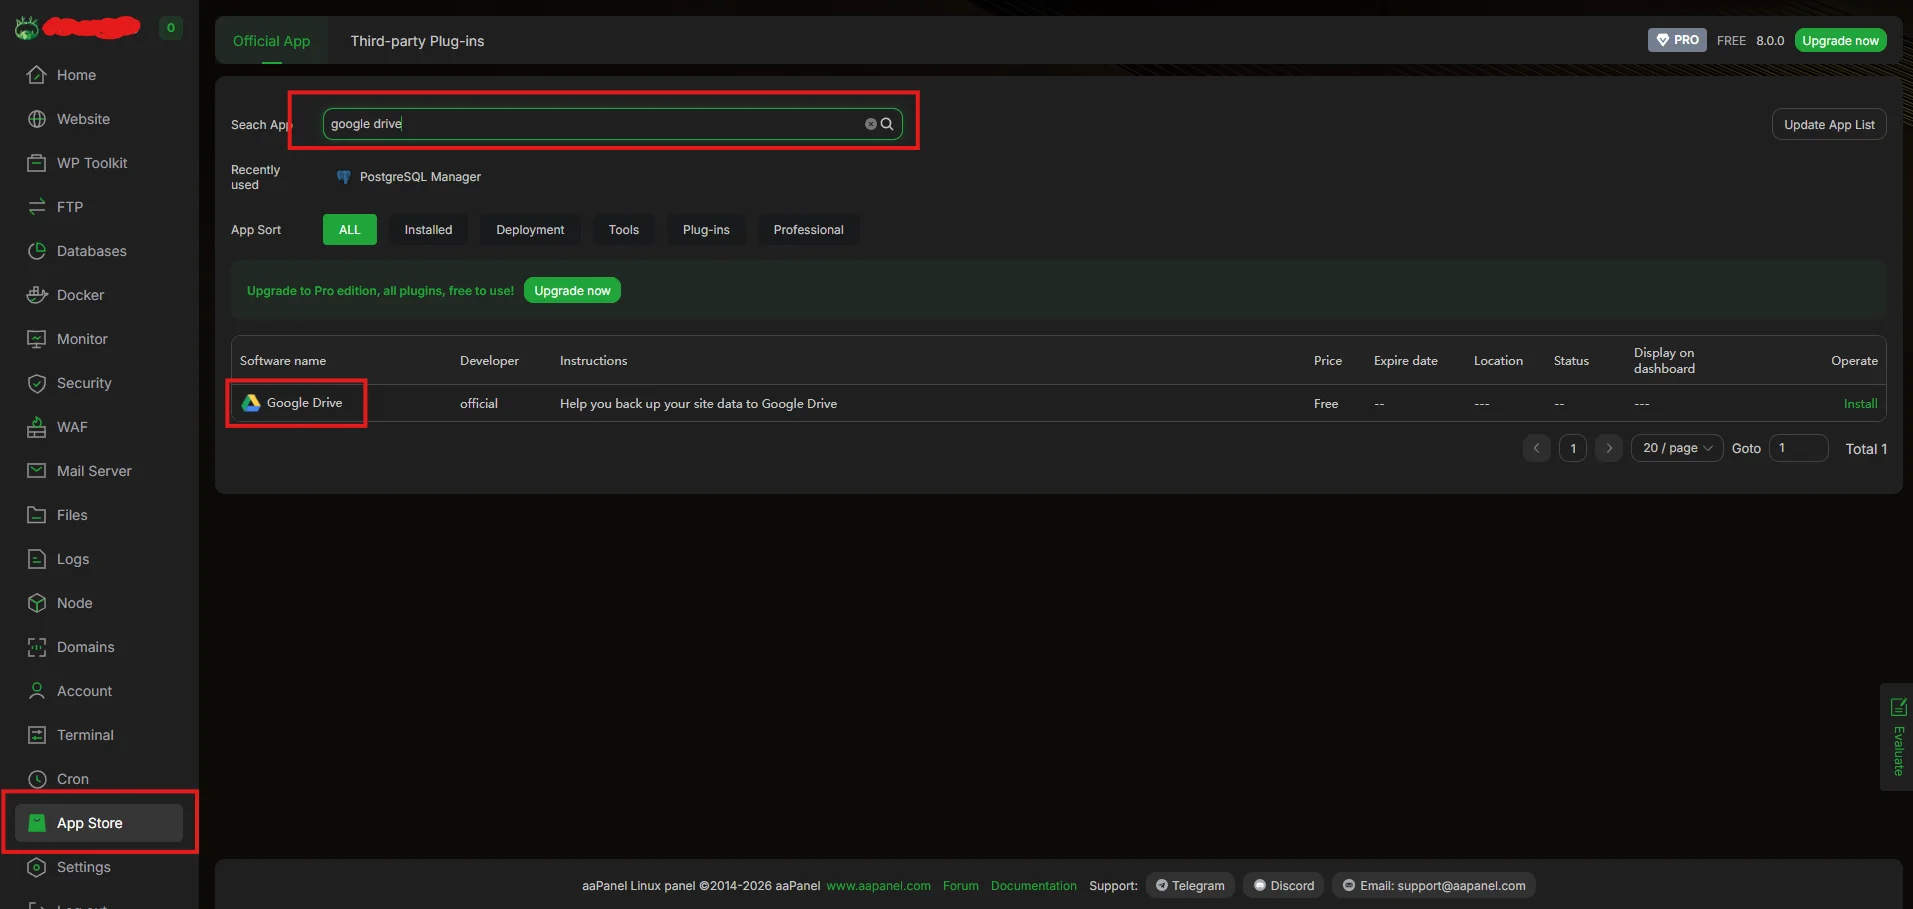
Install the Google Drive Extension
- Open the App Store in aaPanel.
- Search for Google Drive.
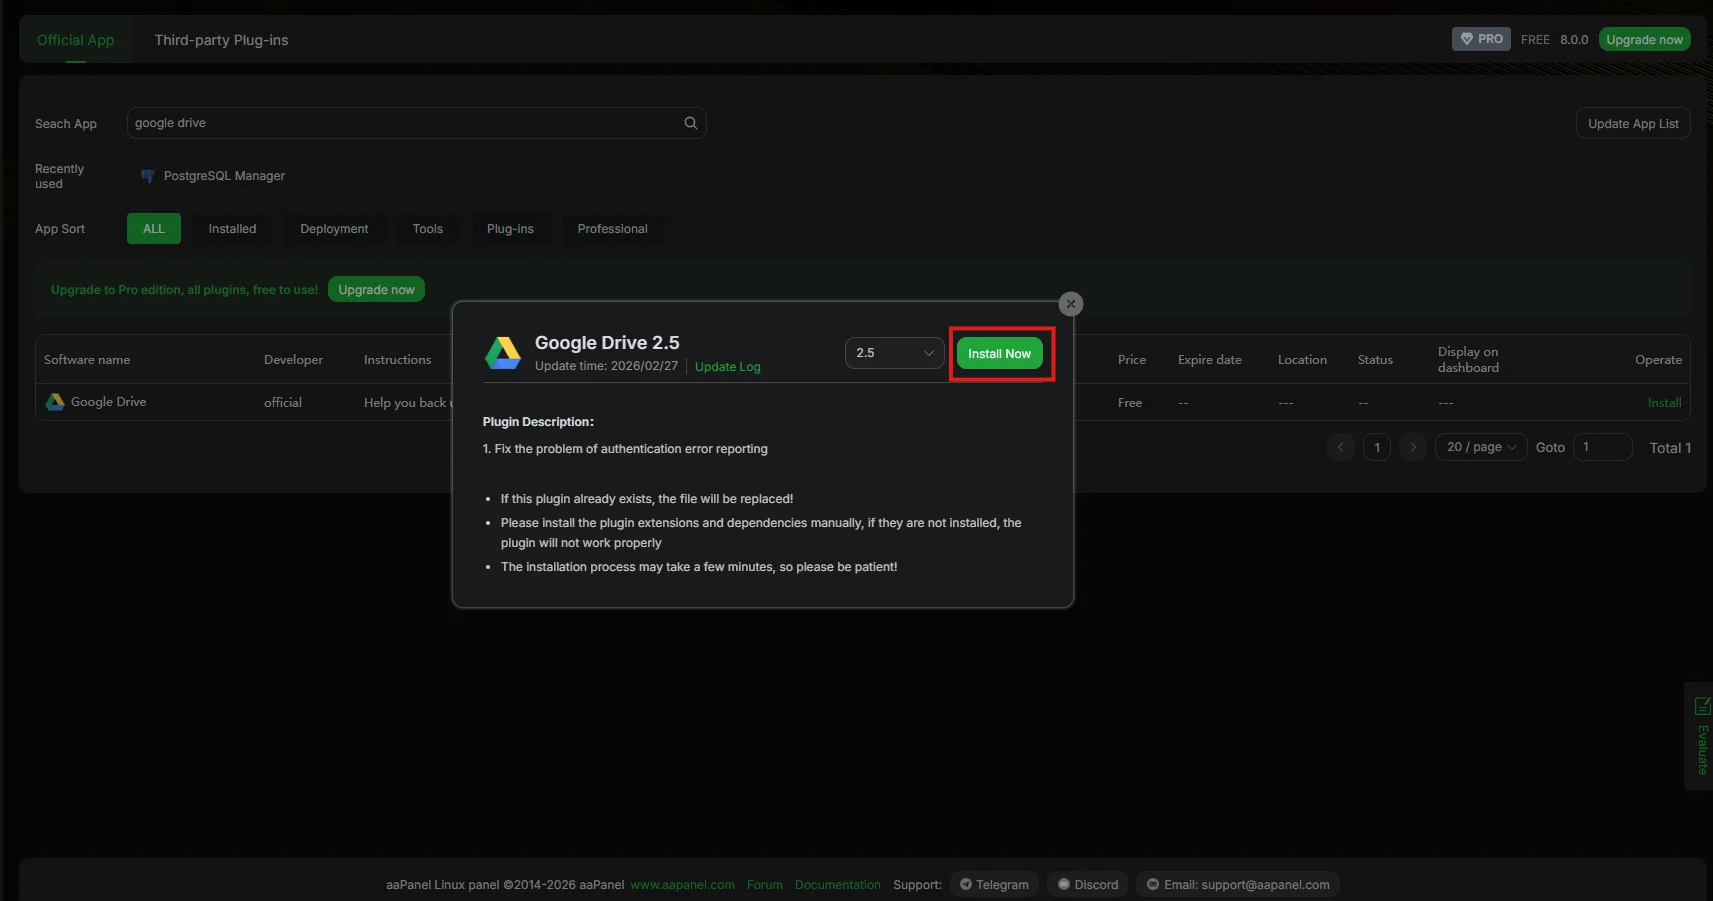
- Click Install and select the latest available version.
After installation you will see the settings option on the google drive app in aapanel click on it

Now you will see the popup google drive settings popup
Connect Your Google Account
Inside the Google Drive settings:
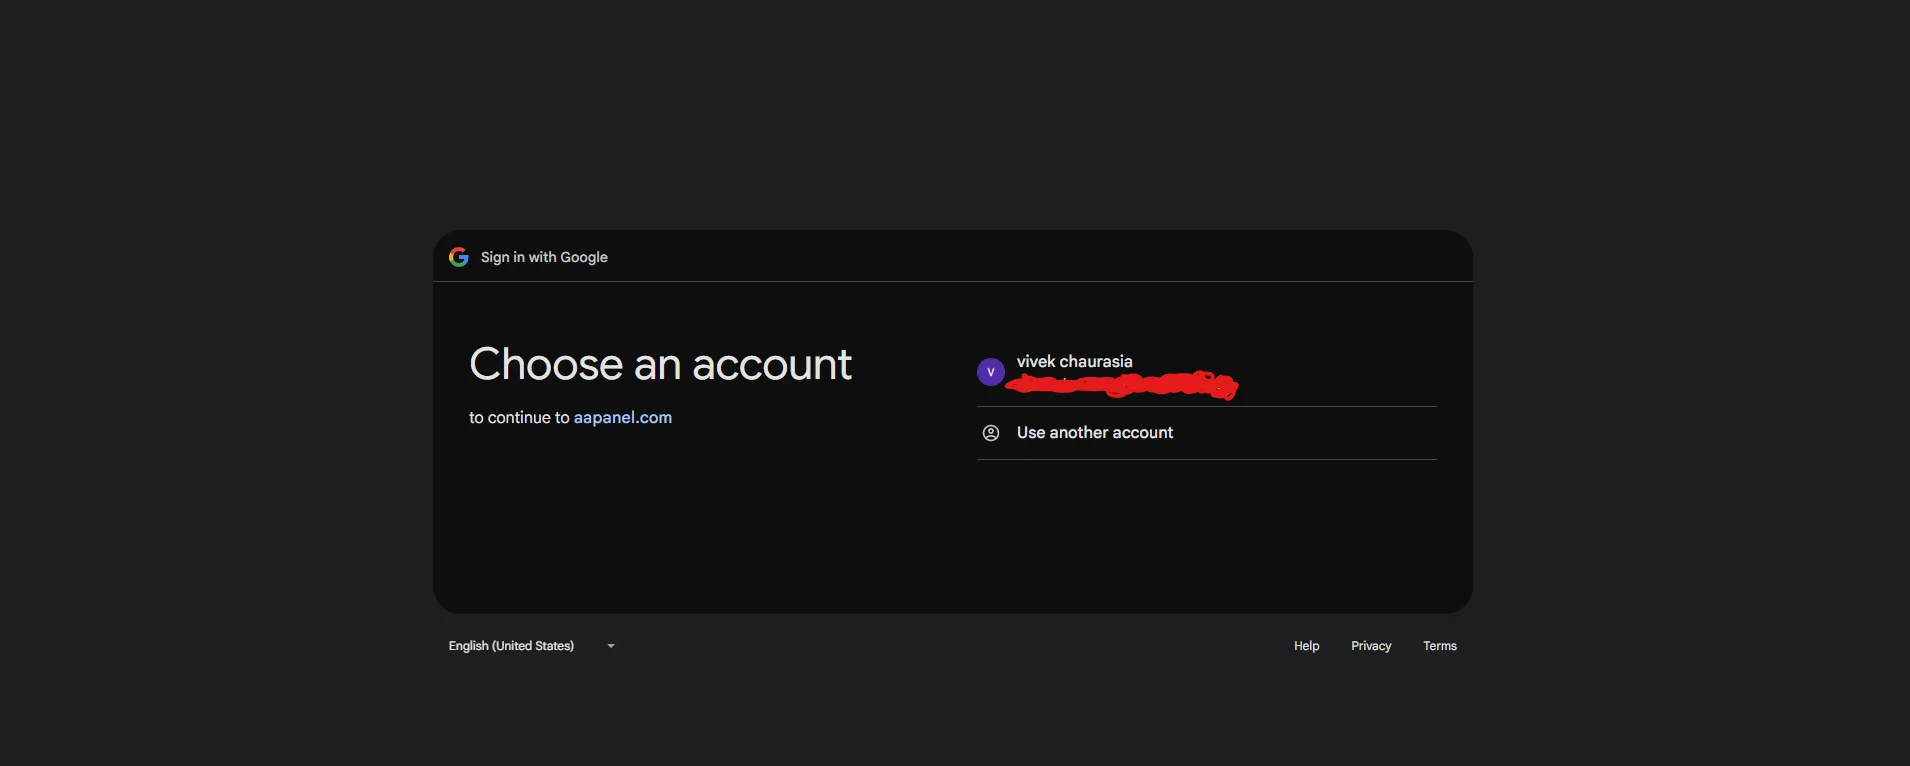
- Click Open Link to begin the authorization process.
- A new browser window will open asking you to select your Google account.
- Choose the Google account where you want your backups to be stored.
Grant the required permissions and click Continue.
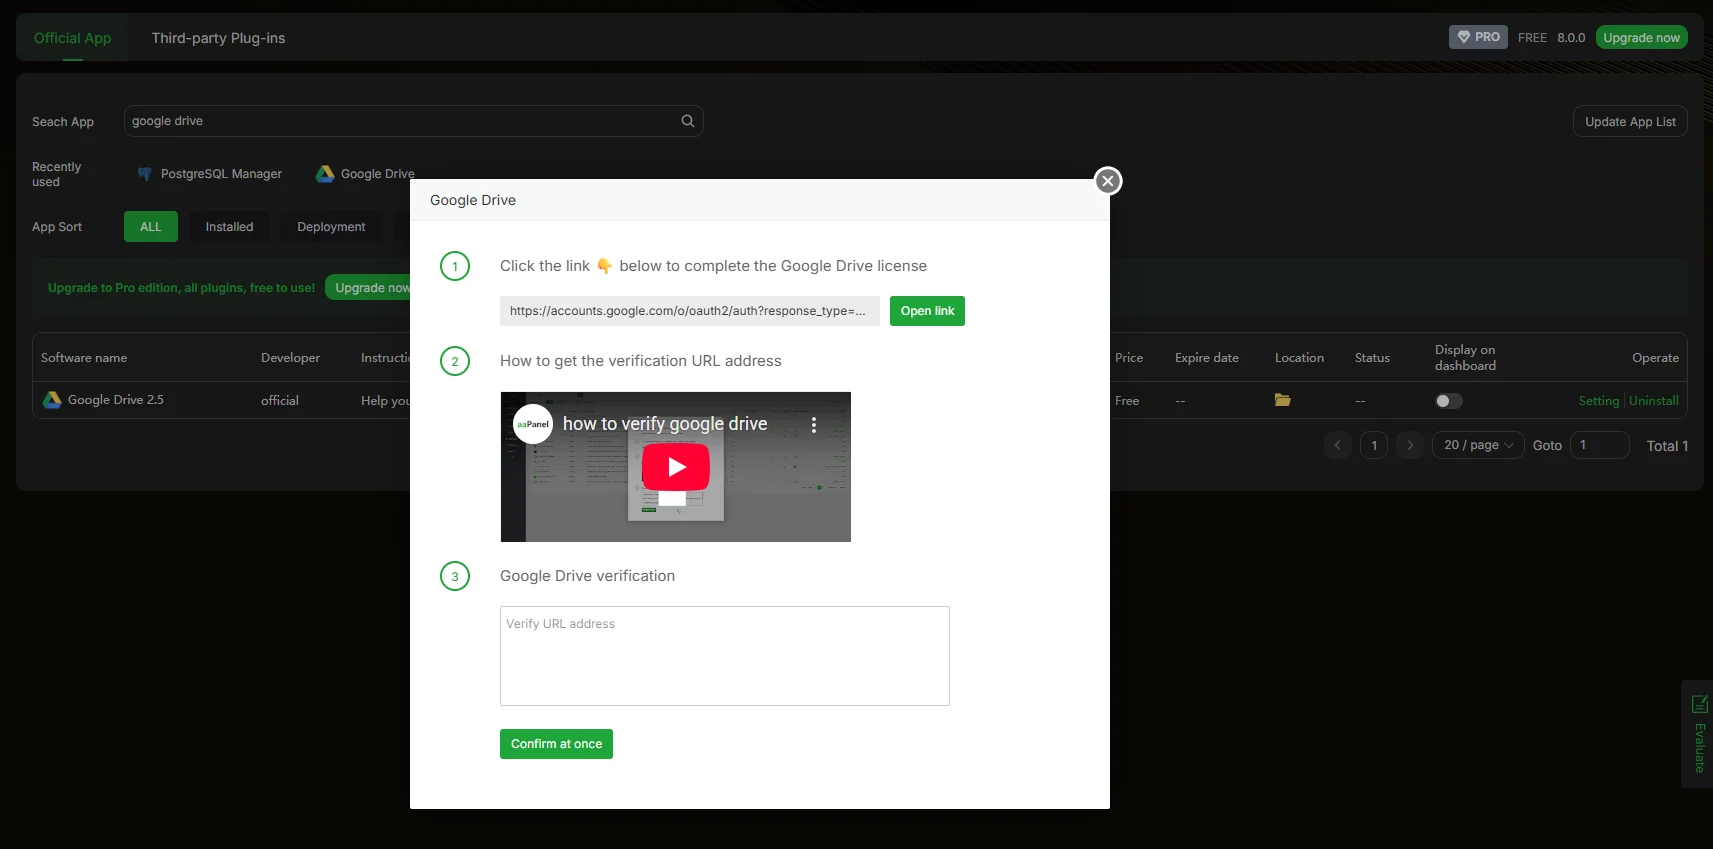
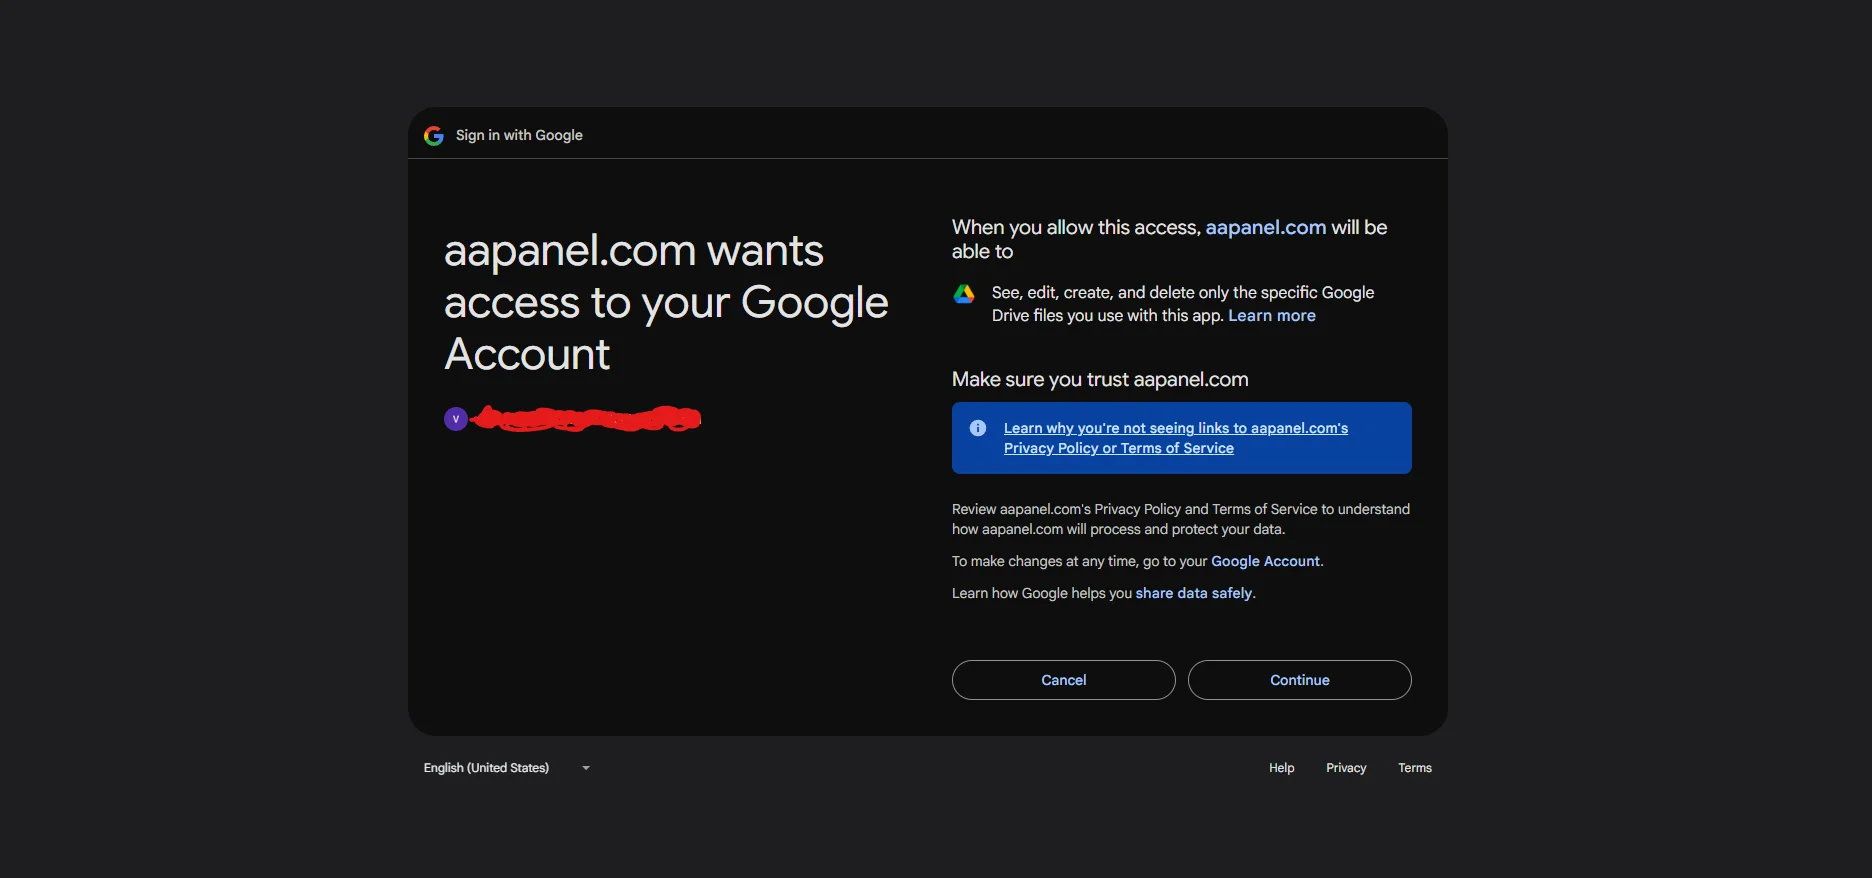
After authorization is completed, Google will redirect you to a confirmation page. Copy the URL from the browser address bar.
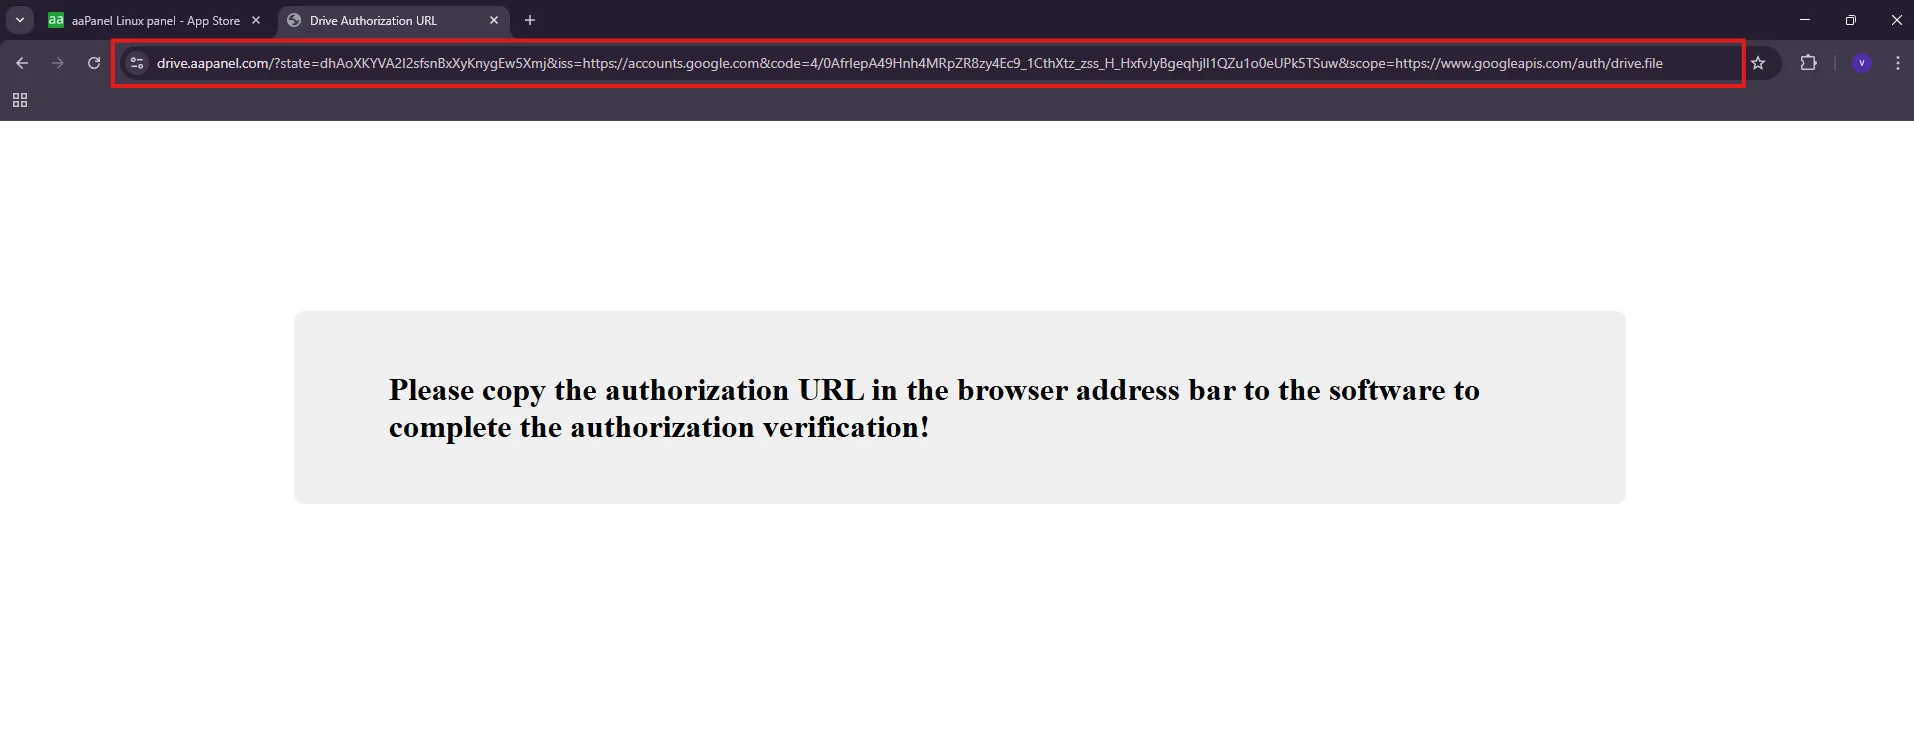
Verify Google Drive Connection
Return to the aaPanel Google Drive settings window.
- Paste the copied URL into the verification field.
- Click Confirm.

If the connection is successful, aaPanel will display a message confirming that the Google Drive token has been verified successfully.
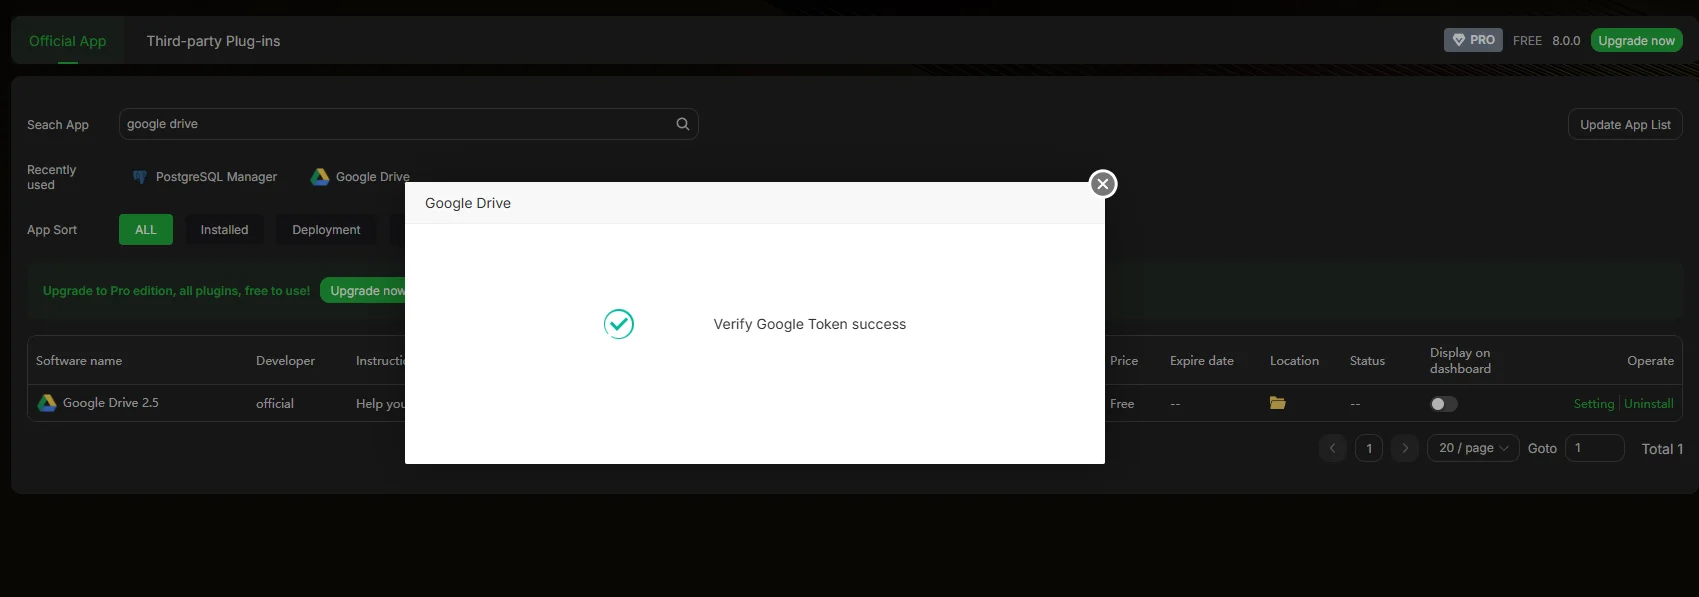
At this point, aaPanel is successfully connected to your Google Drive account.
Step 2: Create Automatic PostgreSQL Database Backups
Now that Google Drive is connected, we can create a scheduled backup for the n8n database.
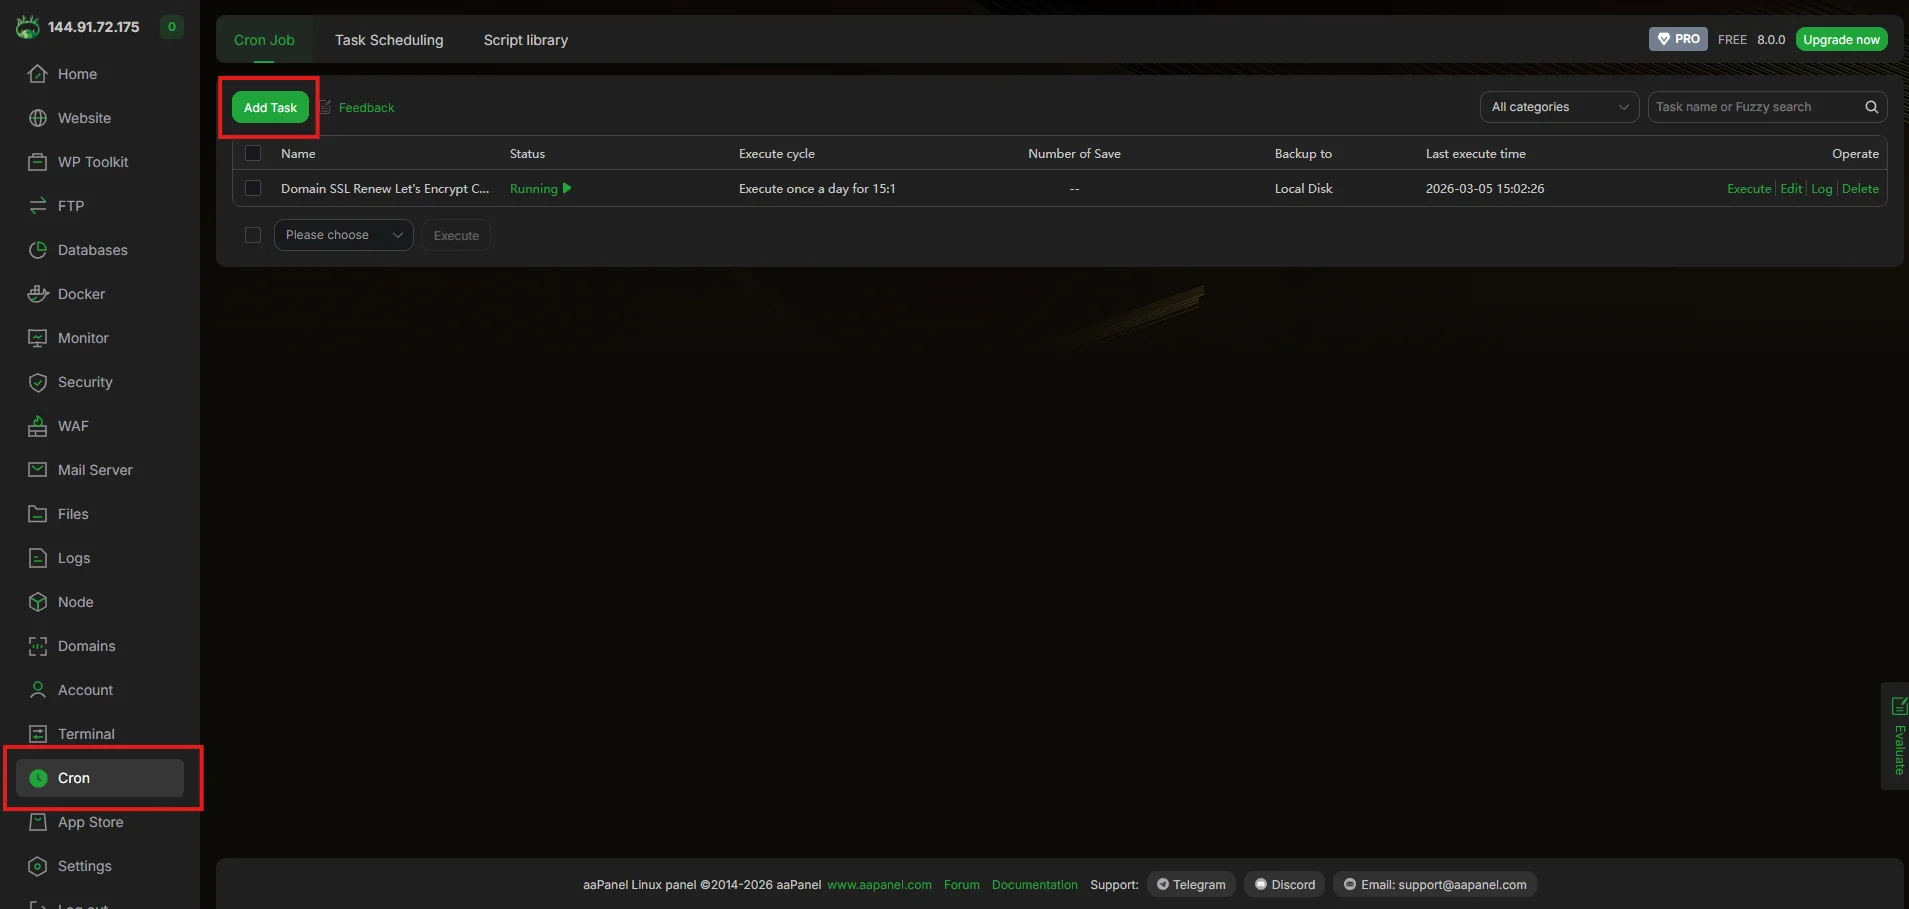
Open the Cron Manager
- Navigate to Cron in the aaPanel sidebar.
- Click Add Task.
Configure the Backup Task
Fill in the task configuration with the following settings:
Task Type = Backup database
Execute cycle = how frequent you want to take the backup
Database = Select the n8n database you created earlier.
Backup to = Google Drive
Retain the latest = Choose how many backup versions should be kept (for example: 3, 7 or 14).
You can also enable:
✔ Keep local backups at the same time
This will store a copy on the VPS in addition to Google Drive.
After all these click confirm

A backup cron has been added.

Test the Backup Task
After creating the task:
- Locate the newly created cron job in the task list.
- Click Execute to run the backup manually.
This will immediately:
- generate a PostgreSQL database dump
- upload the backup file to Google Drive
- display the backup process log

You can confirm the backup by checking your Google Drive storage.


Database autobackup is configured now lets set for the volume backups
Step 3: Create Automatic Backup of n8n Data Directory
In addition to the database, it is recommended to back up the n8n data directory that stores configuration files and runtime data.
For Docker-based installations, this directory is typically located at:
/opt/n8nConfigure the Directory Backup Task
- Go back to the Cron section in aaPanel.
- Click Add Task again.
Use the following settings:
Task Type= Backup Directory
Execute cycle = how frequent you want to take the backup
Backup path = select /opt/n8n as all n8n related files are there
Backup to = Google drive
Retain the latest = Choose the number of backup versions to keep.
Optional:
✔ Enable Keep local backups at the same time if you also want a copy stored on the server.
After all these click confirm

After saving the task, aaPanel will automatically run scheduled backups and upload them to your connected Google Drive account.
This ensures that both:
- your PostgreSQL database
- and your n8n application data
are safely stored and can be restored if needed.
Common Mistakes to Avoid While Self-Hosting n8n
Self-hosting n8n gives you full control over your automation infrastructure, but it also means you are responsible for configuring the system correctly.
Many users successfully install n8n but overlook important configuration details that affect security, stability, and data reliability. These mistakes may not cause immediate issues, but they can lead to workflow failures, data loss, or security vulnerabilities over time.
Below are some of the most common mistakes people make when self-hosting n8n and how you can avoid them.
Using SQLite in Production
SQLite is commonly used in quick n8n installations because it is simple and requires no additional setup. It works well for testing or small personal automation projects.
However, SQLite stores data in a single file and is not designed for environments where multiple workflows run simultaneously.
In production setups, this can lead to:
- database locking issues
- slow workflow execution
- inconsistent execution history
For reliable production deployments, PostgreSQL is the recommended database for n8n. It handles concurrent workflow execution more efficiently and provides better long-term scalability.
Not Setting an n8n Encryption Key
n8n stores credentials for APIs, databases, and external services. These credentials are encrypted before being saved in the database.
If the N8N_ENCRYPTION_KEY is not defined manually, n8n may generate a temporary key automatically.
This can create problems when containers are recreated or when restoring backups. Stored credentials may become unreadable, causing workflows to fail.
To avoid this issue, always define a fixed encryption key in your environment configuration.
N8N_ENCRYPTION_KEY=your_generated_secure_key
This ensures credentials remain accessible even after container updates or server restarts.
Running n8n Without Backups
Many self-hosted setups ignore backups until something goes wrong. If the server crashes or the database becomes corrupted, all workflows and credentials may be lost.
Automation systems often manage important processes such as integrations, data synchronization, and customer workflows. Losing this configuration can disrupt business operations.
A proper backup strategy should include:
- automated PostgreSQL database backups
- backups of the n8n data directory
- storing backups in an external location such as Google Drive
Automated backups ensure that your automation environment can be restored quickly if any issues occur.
Exposing n8n Without Authentication or SSL
Running n8n directly on a public IP without proper security configuration can expose your automation system to potential risks.
If the instance is not protected, unauthorized users may gain access to your workflows or sensitive credentials.
To secure your self-hosted n8n instance, always follow these best practices:
- serve n8n through a domain with HTTPS (SSL)
- enable authentication for the n8n dashboard
- avoid exposing raw server ports publicly
- use a reverse proxy such as Nginx or aaPanel
Using HTTPS ensures that all communication between the browser and the server remains encrypted.
When Should You Hire a Professional for n8n Setup?
Self-hosting n8n gives you full control over your automation infrastructure. However, running it in a stable production environment requires proper server configuration, database management, and security setup.
While many users can install n8n successfully, maintaining a reliable system over time can become challenging. This is especially true when automation becomes part of important business workflows.
In such cases, working with an experienced professional can help ensure your infrastructure is configured correctly and runs smoothly.
Signs Self-Hosting n8n Is Not Right for You
Self-hosting works best for users who are comfortable managing servers and troubleshooting technical issues.
You may struggle with self-hosting if tasks like the following feel difficult or time-consuming:
- configuring Docker containers and environment variables
- managing PostgreSQL databases
- setting up domains and SSL certificates
- configuring automated backups and monitoring
If server management starts taking more time than building automation workflows, it may be a sign that you need a more stable setup managed by an expert.
Business Risks of a Poorly Configured n8n Server
An incorrectly configured server can create problems that may not appear immediately but can cause serious issues later.
For example, poor configuration may lead to:
- workflow execution failures
- database performance problems
- lost workflow data due to missing backups
- security vulnerabilities caused by exposed services
When automation supports business operations, these issues can directly affect productivity and reliability.
A properly configured infrastructure helps ensure that workflows run consistently and securely.
How a Professional n8n Setup Saves Time and Money
A professional n8n setup focuses on long-term reliability rather than just getting the system running quickly.
An optimized setup typically includes:
- a stable Docker deployment
- PostgreSQL configured for production workloads
- secure domain and SSL configuration
- automated backups and monitoring
With the infrastructure handled correctly, teams can focus on building and improving automation workflows instead of troubleshooting server issues.
For businesses that rely on automation, this often saves significant time and operational costs.
Final Thoughts – Is Self-Hosting n8n with Docker and PostgreSQL Worth It?
Self-hosting n8n gives you complete control over your automation infrastructure. Unlike many cloud-based automation tools, a self-hosted setup allows you to manage your workflows, data, and system configuration without platform limitations.
However, the way n8n is deployed plays a major role in how reliable and scalable your automation system will be.
In this guide, we explored multiple approaches to self-hosting n8n—from quick one-click installations to fully controlled Docker deployments. While each method serves a different purpose, production environments benefit the most from a well-structured setup using Docker and PostgreSQL.
Is Self-Hosted n8n Right for Your Business?
Self-hosted n8n is a great choice for businesses and teams that rely heavily on automation.
It is particularly useful when you need:
- full control over your workflow data
- predictable infrastructure costs
- deeper integrations with internal systems
- the flexibility to scale automation as your workload grows
For teams building serious automation systems, self-hosting provides the freedom and reliability that many cloud platforms cannot offer.
Best Use Cases for This Setup
A Docker and PostgreSQL based n8n setup works best for environments where automation plays an important role in daily operations.
This includes:
- automation agencies managing workflows for multiple clients
- SaaS products integrating with external services and APIs
- businesses automating internal operations and data pipelines
- developers building custom workflow automation systems
With the right infrastructure in place, n8n can become a powerful engine for connecting tools, automating processes, and reducing manual work.